[Building JavaScript Audio Effectors] Understanding Audio Flow
Audio Effector Development Starting from GainNode
![[Building JavaScript Audio Effectors] Understanding Audio Flow](/static/026a9fe9c894f201ec1e45217221447c/b384d/thumbnail.webp "[Building JavaScript Audio Effectors] Understanding Audio Flow")
In this post, following the audio waveform drawing from How Do Computers Hear Sound?, I want to explain the process of creating effectors that can apply various effects to audio. HTML5’s Audio API provides various nodes that can apply effects to audio, and most effectors can be implemented using just these nodes - the API is that well-designed.
Also, this post will be written in two parts. This post will cover the overview of HTML5 Audio API and how to use GainNode which can control audio volume, and the next post will explain more complex audio effectors and their production process.
Since I already explained basic theory about audio in the last post, this time I’ll focus not on basic theory but on methods of how audio is actually controlled and effects are applied in recording studios.
Audio Signals Flow
In typical recording studios, we record audio through microphones or load already recorded audio into DAWs (Digital Audio Workstations) like Logic Pro or Cubase. This audio we first receive is called the source.
This source passes through various effectors that can give audio a special feeling - amps, compressors, equalizers, etc. - and finally gets output through speakers or headphones. Understanding this flow makes it easy to grasp the concept of nodes provided by HTML5’s Audio API. First, to help understanding, let me use as an example the system I used when I worked as a sound engineer.
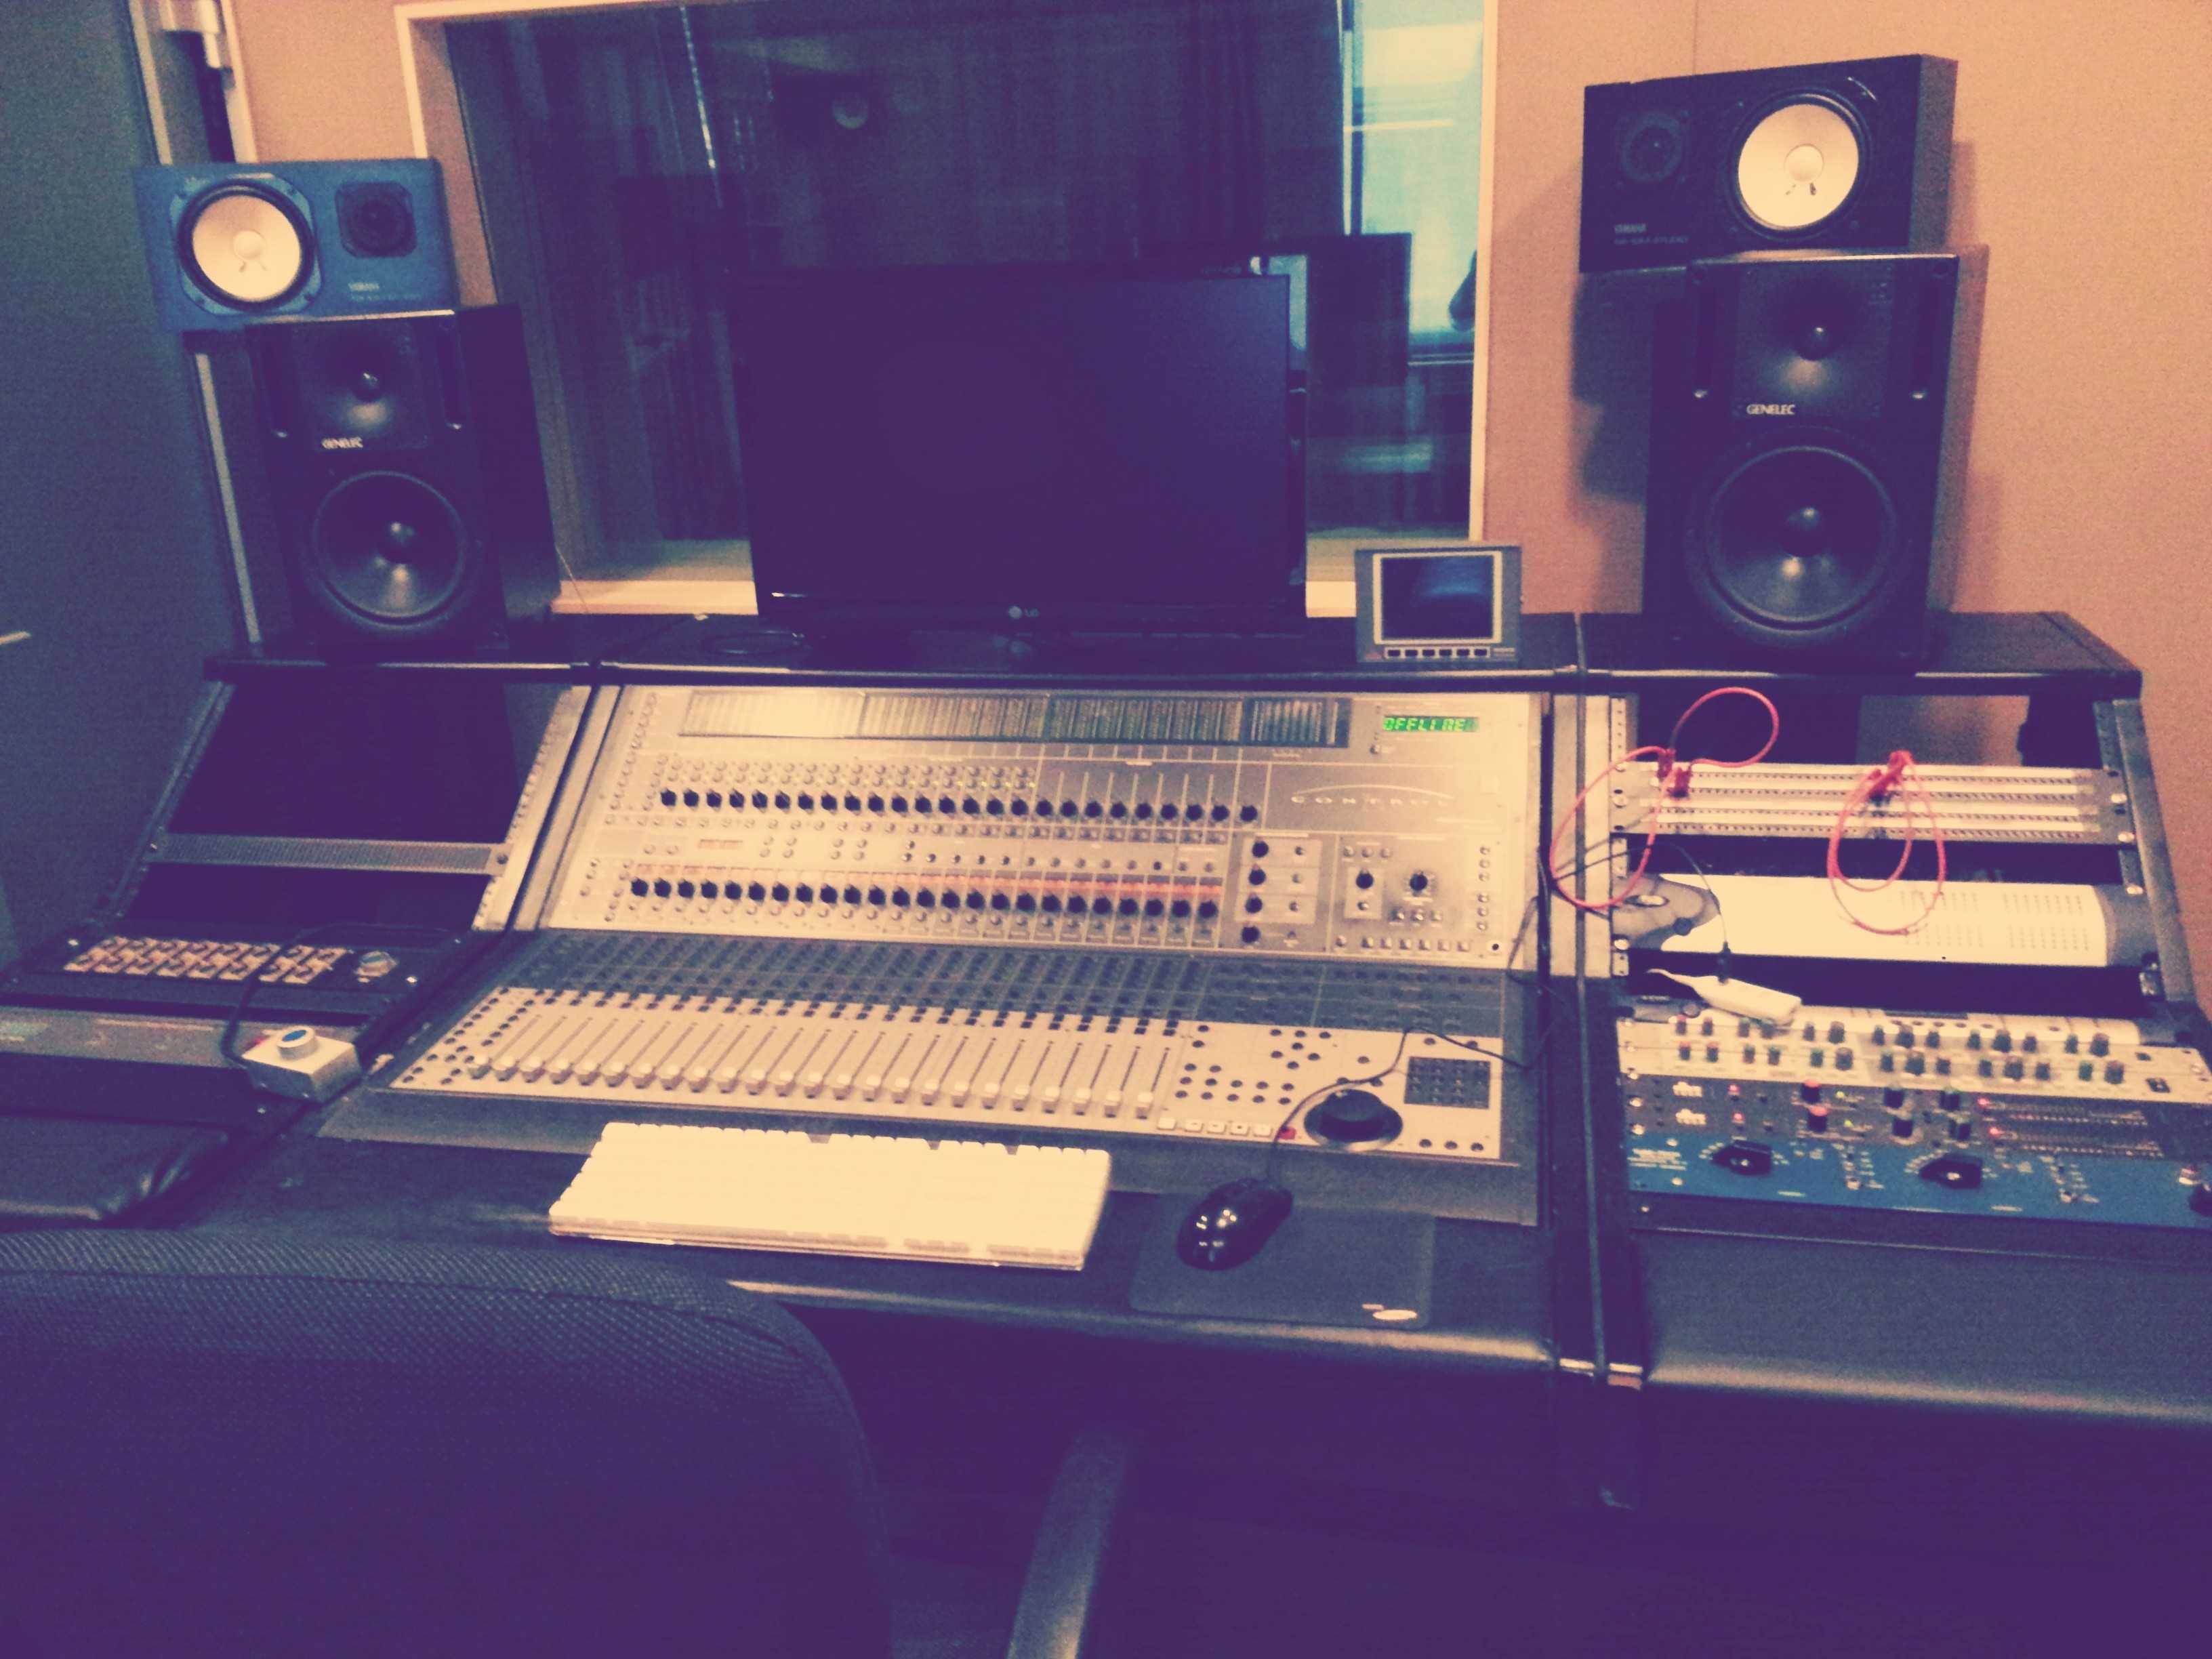 Equipment I used back in the day
The large equipment in the center of the photo is probably equipment you’ve seen a few times on TV. This equipment is a mixing console that plays a kind of control tower role, capable of handling volume, panning, and equalizing of audio sources divided into multiple channels.
And the things to the right of the mixing console are effectors that can apply effects to audio. Usually you fill both sides of the mixing console and use them, but that photo is when the recording studio setup wasn’t finished yet so only a few pieces of equipment are in. And though not shown in the photo, there’s a separate shelf called console rack that’s also filled with effectors.
And looking at the top of the effectors, you can see red wires plugged in - that equipment is called a patch table that can control the flow of audio.
Usually sound engineers use multiple types of equipment even for effectors that serve the same role, because even effectors serving the same role can sound slightly different depending on the equipment.
In other words, even using the same reverb, depending on what feeling the final sound you want to create has, you might use reverb A or reverb B. So the unique algorithms that create this sound quality are manufacturing companies’ trade secrets.
But pulling out cables plugged into equipment one by one every time you want to use a different effector and reconnecting them to other equipment is inefficient, and constantly pulling out and plugging in cables can damage equipment, so you connect lines from all equipment to that patch table and use it. Plus, since cables are mostly located at the back of equipment, you have to push that mixing console forward a bit to see, and just looking at it, doesn’t that large equipment look too heavy to keep pushing and pulling? Your back goes out.
 Patch tables are organized roughly like this
Sound engineers can grasp and control at once the flow of audio signals flowing between multiple complex pieces of equipment through the patch table. The concept of audio signal flow is extremely important to people controlling sound. Not only the hardware equipment I just used as an example, but even when trying to use effectors implemented in software, you ultimately need to implement this flow as is inside the program.
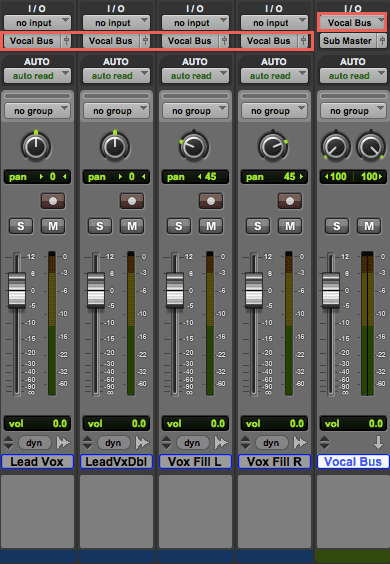
The above photo is the mixer window of Protools, a DAW used by 90% of recording studios worldwide.
Looking at the part marked Vocal Bus in the emphasized area, the rightmost channel is positioned at the top and the other channels are positioned at the bottom. In the I/O menu, the top means In and the bottom means Out, so in this picture the audio flow can be roughly represented as follows.
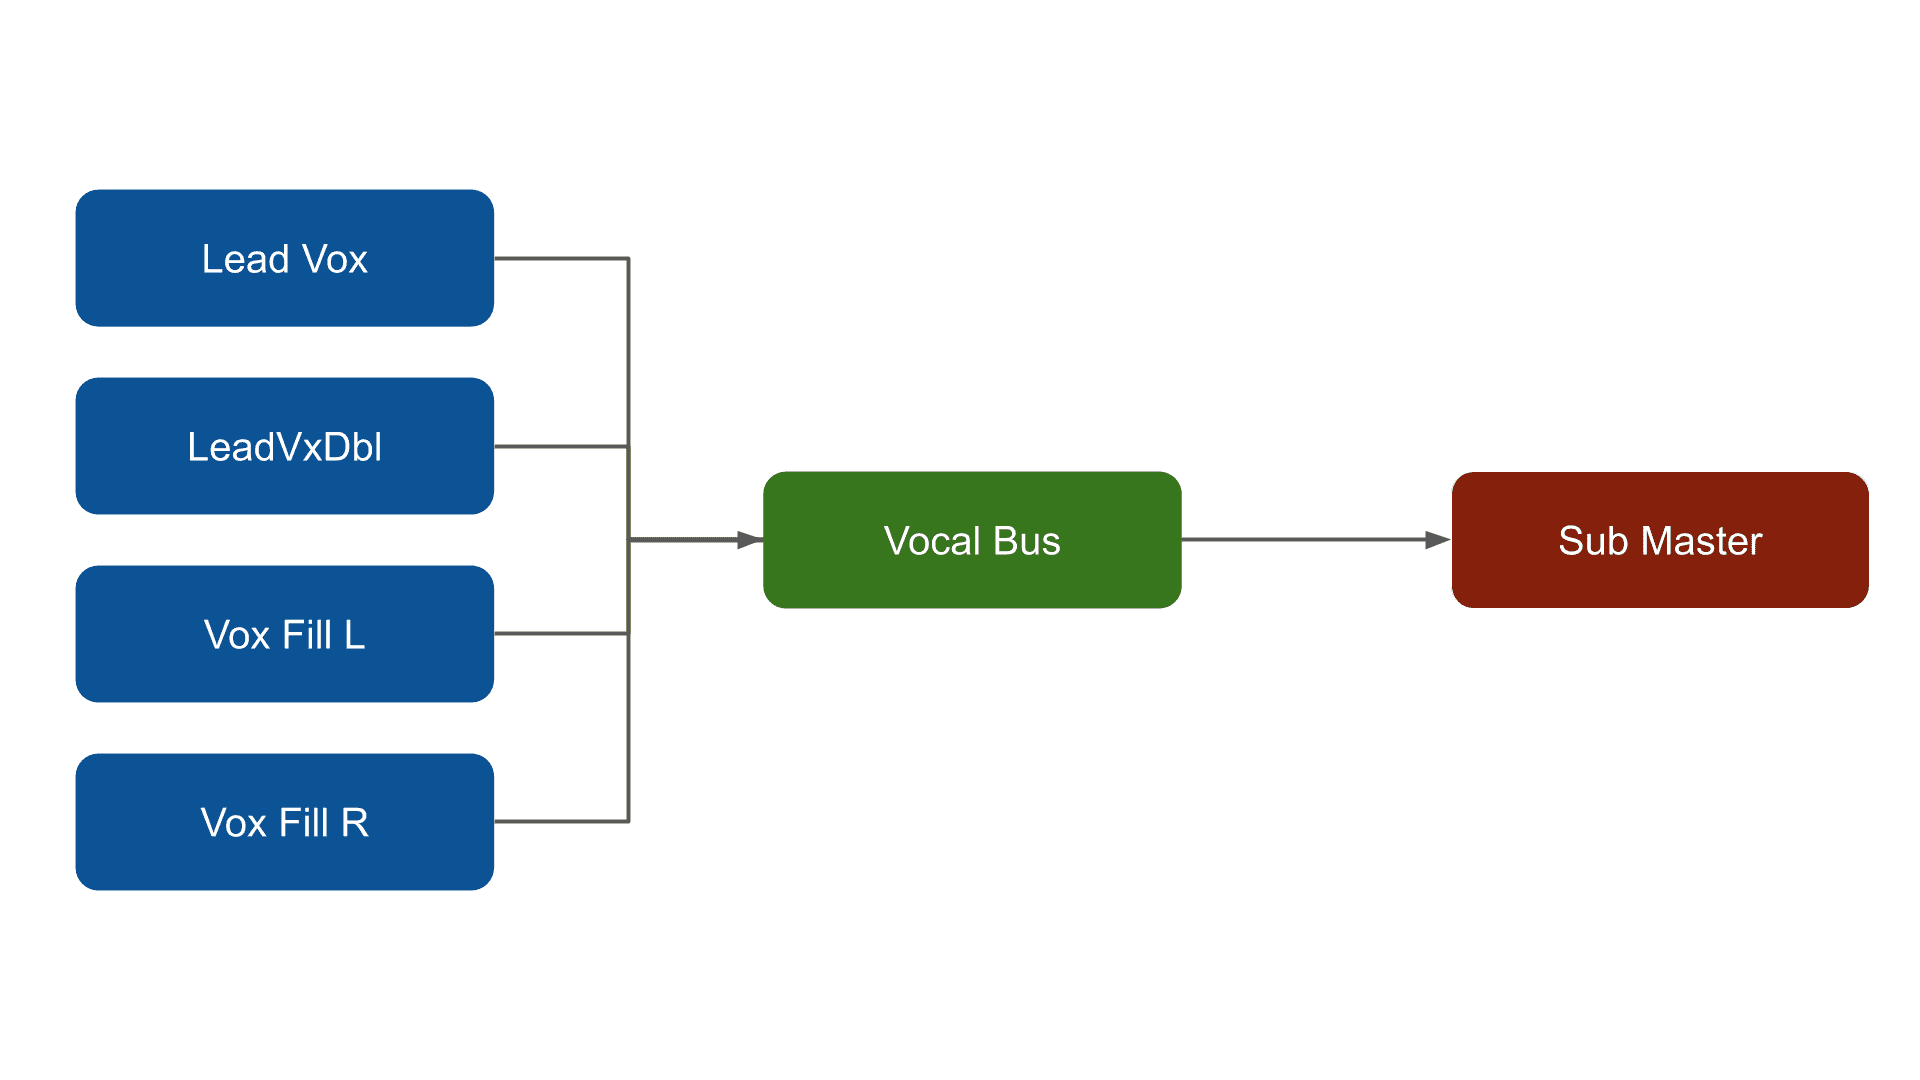
At this time, each of those rectangles is exactly the same concept as nodes provided by HTML5’s Audio API. In other words, you can implement that flow perfectly identically with JavaScript.
To help understanding, let me add a bit more explanation about the roles of those nodes. First, Lead Vox is literally a node with the vocal’s song source, and LeadVxDbl is a node that doubled the work - recording the same melody once more to make the song sound richer. And Vox Fill is a node containing chorus with harmonies stacked.
And these audio sources that the vocal sang are all being gathered into a node called Vocal Bus. The reason for doing this is because if you use effectors on each of multiple audio sources, the sound feeling can differ slightly per node, so you gather audio signals into one node called Vocal Bus then only apply effectors to that node.
Doing this means you don’t need to use effectors on all nodes but only on one node, so you can save memory costs and give one identical feeling to one source called vocal.
And the Sub Master node where signals finally enter was probably created because they wanted to do effector processing once more before sound goes out to final output, and audio that reached Sub Master gets output through output - speakers - and enters our ears. Ultimately you can see it as continuous repetition of in > out > in > out. That’s why I express it as audio flow.
Now that you roughly understand the flow of audio sources, let’s actually implement this flow using HTML5’s Audio API.
Controlling Audio Volume
As I said above, this post will focus on directly implementing and experiencing audio flow before actually implementing effectors.
So I’m going to create a flow with a simple structure that’s a bit ambiguous to call an effector. The flow of controlling audio volume. Using HTML5 Audio API’s GainNode, you can easily control the volume of audio sources.
What is Gain?
Simply put, gain means input volume. You use gain to control the signal amount when sending audio signals from microphones to audio mixers or recorders. People first entering audio get confused about the difference between gain and volume. Simply put, gain is “controlling input signals” and volume is “controlling output signals.”
Imagine a recorder that can process signals with strength around 100. At this time, if we shout at the microphone with strength around 80, this recorder can accept this signal without problems, but if we shout with strength 150, this recorder cannot accept 50 worth of sound and loses it as is.
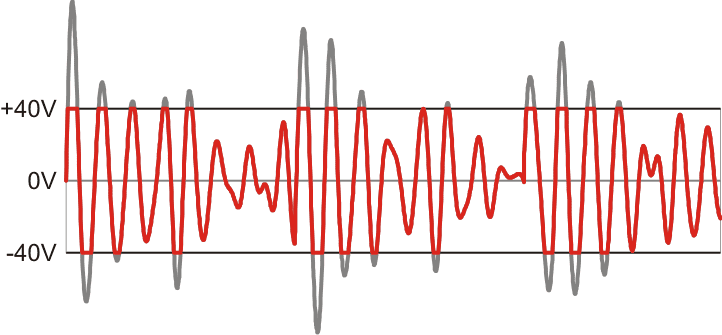 The grayed-out part is the clipped signal.
This phenomenon is one you’ve probably experienced several times in life - when you turn speaker volume really loud, you’ve heard crackling noise. This phenomenon of exceeding the signal strength equipment can handle is called clipping. Literally the signal gets clipped.
This clipped signal, as you can see in the above diagram, takes the form of a square wave with a flat rectangular head, and this square wave makes the “zwaang~” metallic sound of synthesizer lead-type sounds you can hear a lot when expressing melodies in EDM, etc. Words probably don’t make sense, so let’s take a break and listen to it in music. Probably people who’ve been to clubs will say “Ah! That sound.”
Since leads are instruments so the waveform is somewhat refined, the sound when clipping occurs is rougher and sharper than this. By the way, this concept of sound changing according to waveform is a concept also used when making distortion-type effectors, so it’s good to remember.
Anyway, because of this clipping problem, sound engineers place devices that can control gain between audio sources and the next equipment, and appropriately adjust gain to match the signal strength the equipment can accept, so even if the source audio’s signal gets larger, all signals can be captured.
Conversely, volume means how much to amplify when outputting sound. The reason many people confuse gain and volume is because both play roles of amplifying or reducing sound, but since volume touches already input signals when outputting, if clipping occurs then reducing volume returns the signal, but sound lost due to incorrectly setting gain when recording doesn’t return.
It’s already lost at the signal input stage, so it’s goodbye forever. Plus, due to the nature of recording, that original source is often a person. Ultimately, since this lost signal can’t be revived, incorrectly setting gain can lead to the sad situation of having to record again.
So sound engineers think handling gain well when recording sound is extremely important. Actually even just gain has a lot more to say if you go deeper, but since this post isn’t an audio-specialized post, it’s fine to just think of them as similar and move on.
Now that you understand what gain is, let’s use GainNode to adjust audio source signal strength and transform sound size!
Let’s Control Volume Using Gain Node
First, to use gain you need an audio source. Audio sources can be obtained in two ways: using HTML5’s <audio> tag or extracting from files users directly uploaded. I used the latter method.
This also, strictly speaking, creates different source node objects when extracting sources using <audio> tags versus extracting directly from file buffers, but since there’s no big functional difference, just do it according to personal preference.
const audioContext = new (Audiocontext || webkitAudioContext)();

document.getElementById('audio-uploader').onchange = evt => {
  const file = evt.currentTarget.files[0];
  if (!file) {
    return;
  }

  const reader = new FileReader();
  reader.onload = async evt => {
    const buffer = await audioContext.decodeAudioData(file);
    const sourceNode = audioContext.createBufferSource();
    sourceNode.buffer = buffer;
    console.log(sourceNode);
  }
};
AudioBufferSourceNode {buffer: AudioBuffer, playbackRate: AudioParam, detune: AudioParam, loop: false, loopStart: 0, …}First, a simple explanation: the audio data contained in the buffer variable is just raw audio data and isn’t yet a node so it’s unusable. Therefore, only after creating a source node using the createBufferSource method and inputting audio data into that source node does the audio data become usable.
At this time, since I extracted audio buffer data directly from files users uploaded and made nodes, I used the createBufferSource method to create source nodes, but if you want to create source nodes using audio data extracted from <audio> tags, you should use the createMediaElementSource method.
Now if you just create a GainNode and connect it to the source node, you can immediately control this audio source’s volume.
const gainNode = audioContext.createGain();
sourceNode.connect(gainNode);
gainNode.connect(audioContext.destination);
If you can see the audio flow set as source > gain node > destination in this code, you can say understanding of Audio API is pretty much finished. As I said above, this concept is most important when controlling audio.
Also, audioContext.destination that gainNode is connected to has information heading to final output - speakers. So now, how should we amplify or reduce audio sound here?
gainNode.gain.value = 1.2;
// or
gainNode.gain.setValueAtTime(1.2, audioContext.currentTime);

// Then let's play the source
sourceNode.start();
[Warning] If you raise the value too much, your eardrums will burst when playing.
Simple. Just access GainNode.gain.value and change the value. For gain, directly accessing and changing values is possible, but for other nodes there are cases where directly changing their values isn’t allowed. In such cases, use the setValueAtTime method.
The setValueAtTime method is a kind of scheduler concept - it has the function of applying values after the time passed as the second argument. The unit of time passed as an argument here is seconds. Using audioContext.currentTime as an argument applies value changes immediately.
One thing I was confused about when first changing these nodes’ values was the minimum and maximum values that can be input to nodes. In other words, I couldn’t know the range of values this node has. Of course it’s all in the official documentation, but who has time to search and read that one by one?
So digging a bit more into the documentation, I could see that values these nodes have are commonly AudioParam type. This type has min, max, defaultValue, value properties, and these values can be usefully used when controlling audio using input[type="range"].
console.log(gainNode.gain);AudioParam {value: 1, automationRate: "a-rate", defaultValue: 1, minValue: -3.4028234663852886e+38, maxValue: 3.4028234663852886e+38}If you check this value well and set the gain value, you can at least prevent the unfortunate accident of eardrums and earphones bursting. As I said above, if you exceed the signal strength the computer can handle, clipping occurs and tearing sounds happen, so if you were wearing earphones, not joking, your ears could really get damaged.
Okay, I’ve simply adjusted the gain of audio sources like this. Most other effectors are also implemented in this kind of feeling. Occasionally there are effectors that need slightly more complex connections, but in most cases they can be implemented just by connecting a few simple nodes, so they’re not that difficult.
In the next post, based on the concepts we learned this time, I’ll create other effectors that can compress sound, give spatial feeling, and cut specific frequencies to give sound a special feeling.
Also, if there’s a chance, I plan to proceed with a post where I can create my own instrument using an oscillator that can actually generate audio signals themselves, not effectors that transform already existing audio sources.
That’s all for this post on building JavaScript audio effectors - understanding audio flow.
관련 포스팅 보러가기
[Making JavaScript Audio Effectors] Creating Your Own Sound with Audio Effectors
Programming/AudioHow Do Computers Hear Sound?
Programming/Audio[JS Prototypes] Implementing Inheritance with Prototypes
Programming/JavaScriptBeyond Classes: A Complete Guide to JavaScript Prototypes
Programming/JavaScriptHeaps: Finding Min and Max Values Fast
Programming/Algorithm