Migrating from Hexo to Gatsby
A Small Feature Turned into a Full Blog Migration… An Unexpected Journey of Migration

During the last golden week, I migrated my blog that I had previously made using Hexo to Gatsby. In this post, I would like to share what I learned from this migration work and issues I didn’t expect.
The Beginning of Yak Shaving
In fact, I tried to continue using Hexo at first. Of course, it’s true that React-based Gatsby is more comfortable than ejs-based Hexo, but I thought doing this would be a waste of resources, given that I couldn’t write posts during the migration.
Also, I think the main content of the blog is the post itself, so I don’t have to add various features to the blog. When I need to add some features to my blog, I just need to find and use Hexo plugins created by others.

However the problem occurred in an unexpected place. I had a plan to translate blog posts which I wrote to english, and I was going to setup i18n on my blog before the golden week began, and then translate some posts.
I thought I could easily add i18n functionality to my blog. This is because Hexo supports i18n configuration by itself, and the Icarus theme I was using also supports this configuration.
In addition, I had expected this would not be a big deal, as Hexo’s i18n Setup Guide document says. it says that I just add language types to the config file, I could simply build an environment in which multiple languages can be used within the application.
# _config.yml

language:
  - ko
  - en # This is new language!

# ...
According to Hexo’s guide document, adding the i18n setting looks a very simple task that could be done in a several minutes. But…
.
.
.
.
ERROR Render HTML failed: index.html
TypeError: /Users/evan/dev/evan-blog/themes/icarus/layout/layout.ejs:2
    1| <!DOCTYPE html>
 >> 2| <html <%- has_config('language') ? ' lang="' + get_config('language').substring(0, 2) + '"' : '' %>>
    3| <head>
    4|     <%- partial('common/head') %>
    5| </head>
What the...?
Unlike Hexo’s document, which explained that adding some code lines to the config.yml would be a happy ending, the reality was tough.
Why I got a this error? It’s simple. When multiple values are set in one props in configuration, the Hexo’s configuration parser parses these values to an array. However the Icarus theme uses the substring method because it assumes that the language property is a String type.
In this situation, There were 4 ways that I could choose.
- Fixing the Icarus theme.
- Using other Hexo theme that supports i18n well.
- Making my own Hexo theme.
- Migrating to Gatsby.
Themes of Hexo are not installed by package managers like npm or yarn, it is cloned from github repository and included to your application source. So you can freely fix Hexo themes by yourself without Pull Request to contributor’s repository.
But as my sight, it is not simple situation like that. Because if I change language property to an array, side effects will occur not only in the layout.ejs but also elsewhere.
So how about option 2? That is not a good choice either.
The fundamental problem with this situation is not just that the theme does not support the i18n, my blog is too dependent on the limited functions of theme which made by other people. In other words, even though if I change my blog to other theme that supports this feature, this situation will be occurred again.
How about option 3 to create my own Hexo theme?
If you make Hexo theme, you must use old techniques such as ejs and jQuery. Moreover, the amount of resources consumed by creating themes or migrating them is not much different. Rather it is better to draw UI with Gatsby which is React-based than with ejs.
These are why I decided to move from Hexo to Gatsby.
Actually, it is quite easy that migrating from Hexo to Gatsby. Official blog also provides a guide document titled Migrating My Blog From Hexo To Gatsby, and that process is not complicated.
However my blog is service that many people are using, I have to do extra tasks that recreate all of original features on my blog, not just change static page generator. It is not a simple task because if Gatsby doesn’t support the features that I have been using easily with the Hexo plugin, I should create them all.
But now, I got the 6 days golden holiday on April 30 on Buddha’s Birthday. and This long holiday season will not come again in this year, so it was a last chance to proceed with such a grand project. So, I had made branch, and started working on moving from Hexo to Gatsby.
 The beginning of yak shaving...
Intoroducing Gatsby

Gatsby is a free and open source framework based on React that helps developers build blazing fast websites and apps
Gatsby is the React-based static page generator.
Personally, Gatsby’s biggest advantage is probably reaction-based. Already, this is a UI library loved by front-end developers around the world, so learning costs are relatively lower than Hexo based on ejs or Jekyll based on Ruby.
Also if you use project starters made by other people, you can quickly set up your project because you don’t have to make your own boilerplate code. And I used gatsby-starter-blog project starter.
$ gatsby new evan-blog https://github.com/gatsbyjs/gatsby-starter-blogIn addition to the starter I used, there are also many starters created by other developers, so you can browse github and choose a starter.
Another unique thing is that Gatsby uses GraphQL to fetch data within React component. Many developers are familiar with REST APIs, so it may be a bit awkward at first, but the concept itself is not that difficult. I think I can adapt quickly.
GraphQL
GraphQL(Graph Query Language) is literally a new concept of query language. This means that it is used as a means of questioning to import data from certain systems, such as SQL(Structured Query Language), which we often use.
SQL is used to query the database to get the data stored in the database system, but GraphQL is used by clients to query the server to send data.
SELECT frontmatters, title, thumbnail FROM post WHERE post_id = 1;{
post(fields: {
id: { eq: 1 }
}) {
frontmatters
title
thumbnail
}
}When using the REST API, the client simply sent a request to the endpoint provided by the server and received a predetermined structured response to use the data, but the client using GraphQL actively selects the data that they need and queries the server. It has the advantage of being able to.
However, the advantage of the client’s ability to send a query for the desired schema can be disadvantageous in terms of security due to the nature of the client program giving control to the user. In addition, client developers may be writing slow queries because they are often less experienced with databases than back-end developers.
For this reason, GraphQL’s backend system must take appropriate measures for this situation, and these shortcomings of GraphQL can be judged to be less stable than REST API, so it is rarely used in large-scale projects. (In fact, developers’ opinions on GraphQL are also quite different)
However, because Gatsby is a static site generator, the situation using GraphQL to blow queries is limited to compile time, not runtime, and slow queries aren’t really hurting the user, but the build is a bit slower. Therefore, it can be seen that these disadvantages are relatively offset environments.
Let’s use the GraphQL
Gatsby provides a separate page to freely run queries in the local environment. This page serves as a kind of API document like Swagger. If you run the local server using the gatsby develop command and connect to localhost: 8000 / __ graphql, you can see the query test page provided by Gatsby.
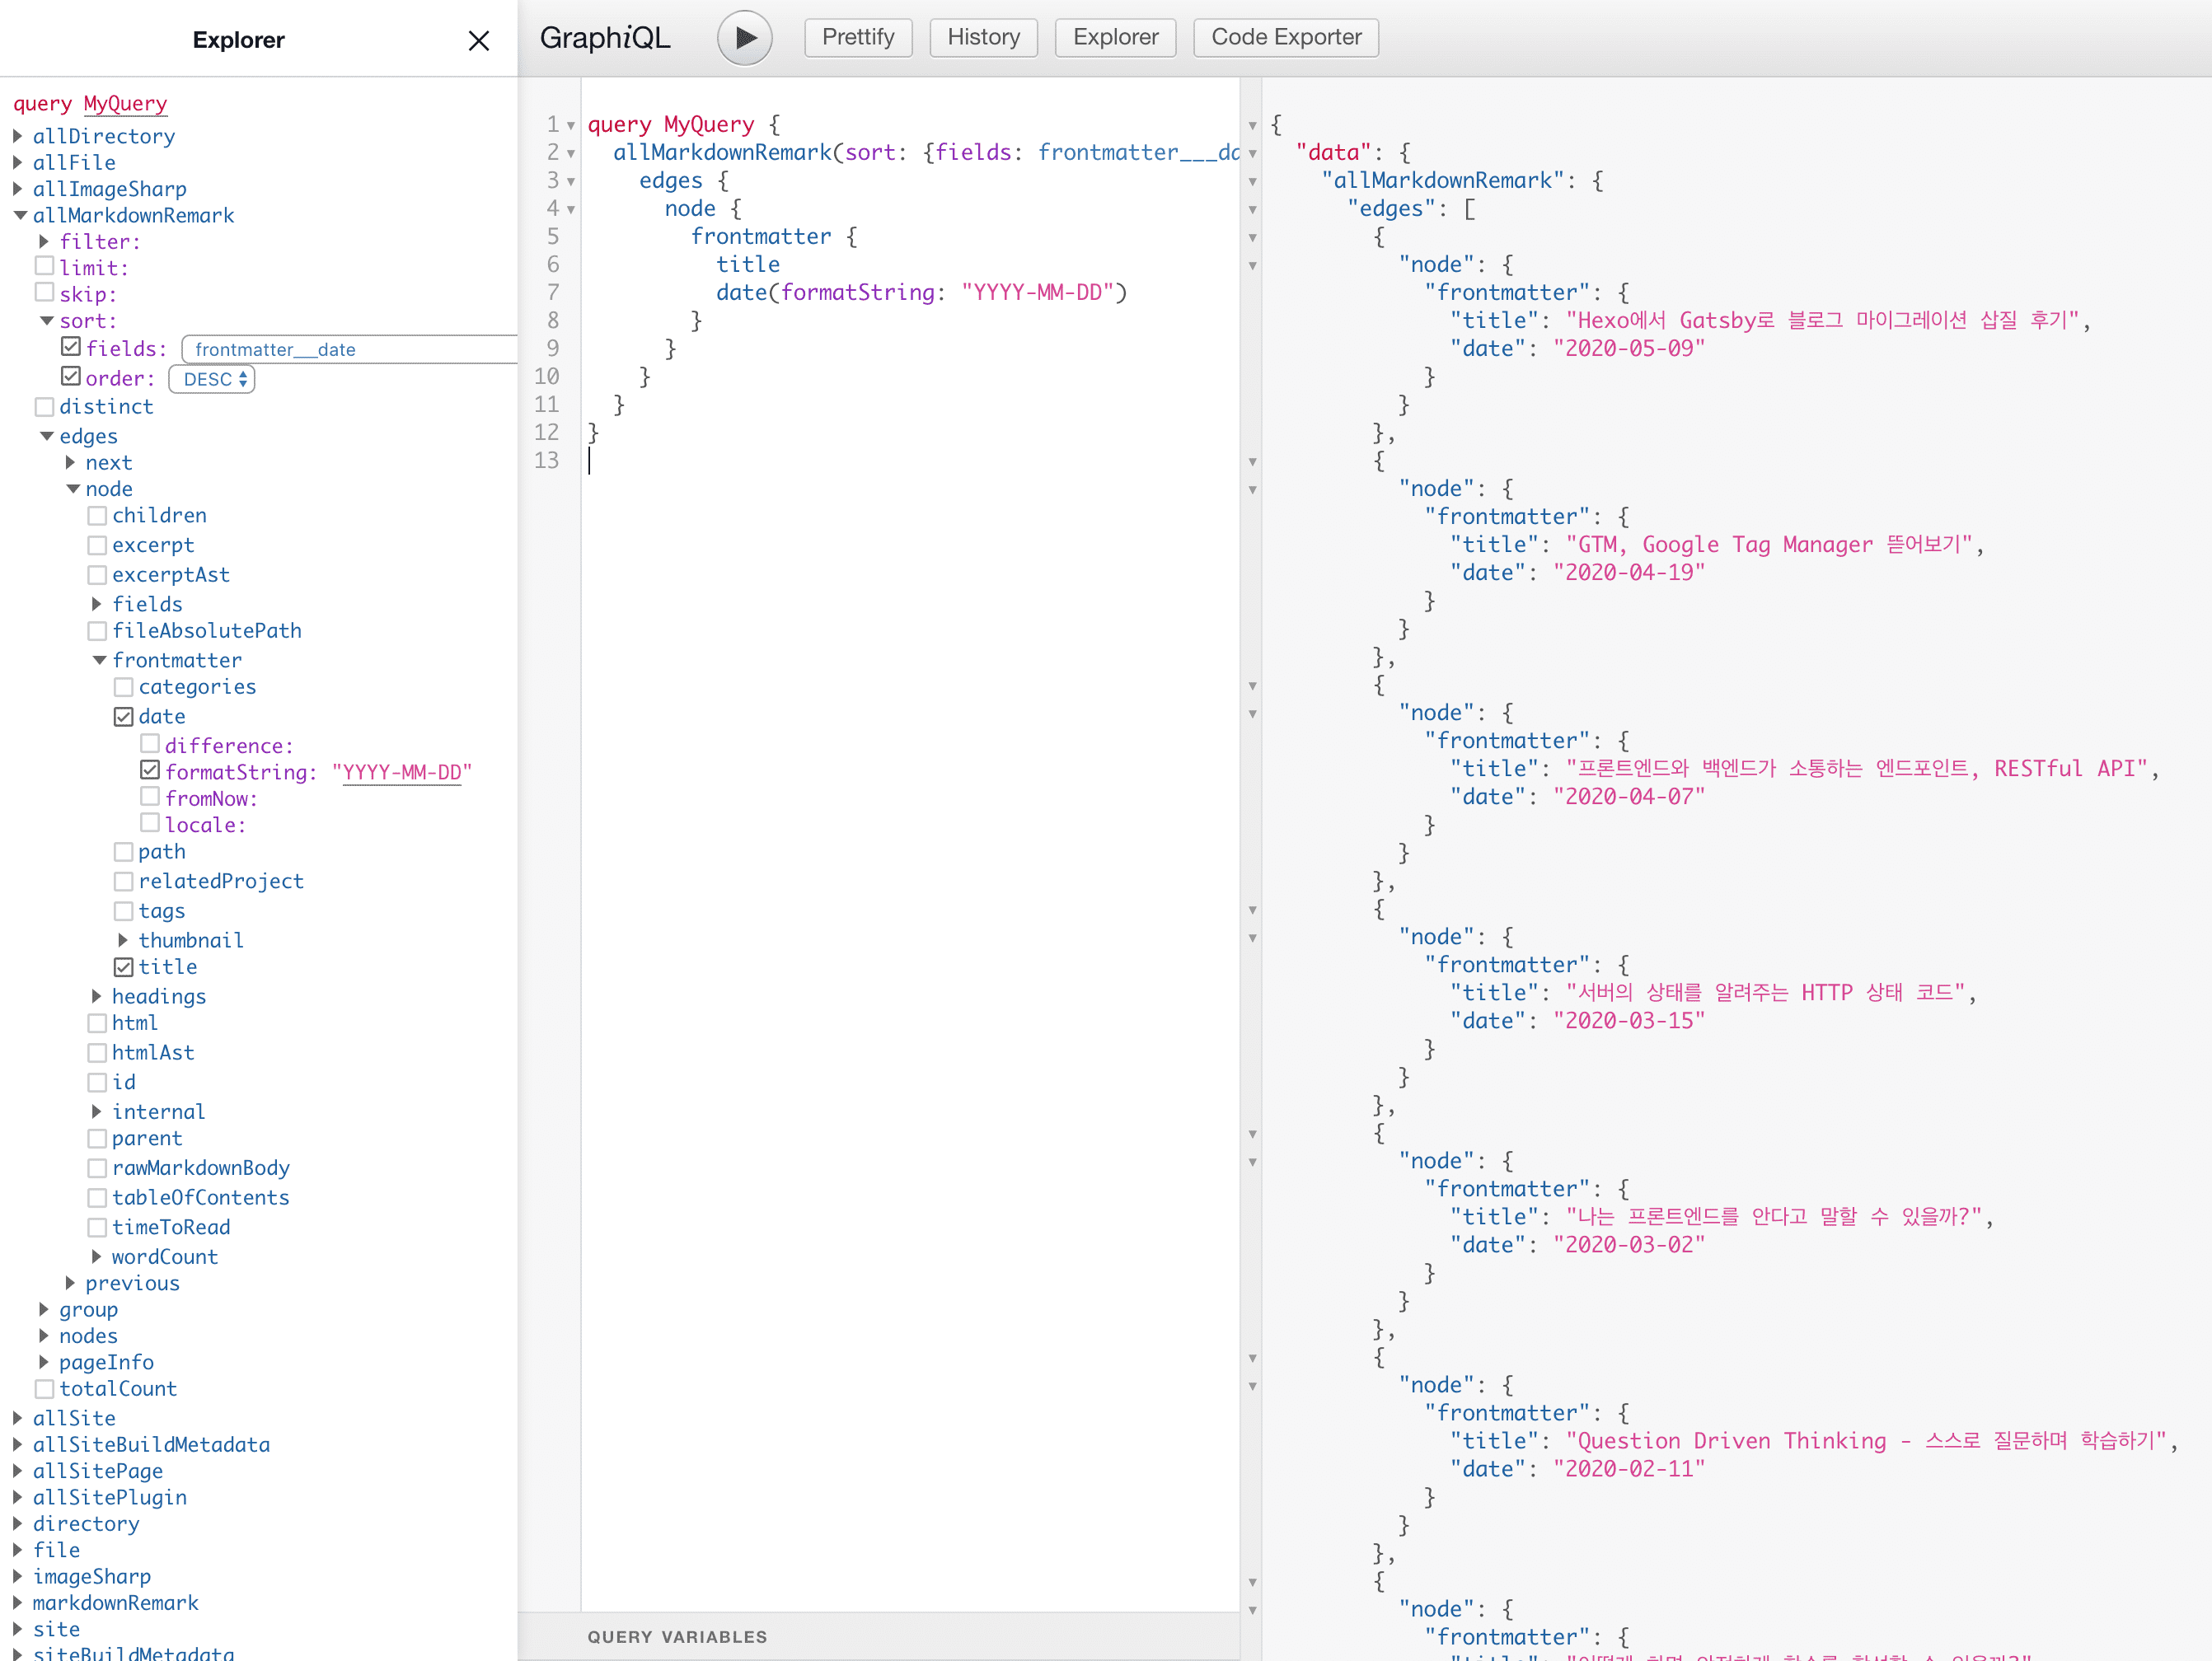
I also had very little experience with GraphQL, so I wasn’t very good at first, but after looking at this page for about 30 minutes, I was able to figure out how to query.
My chosen starter gatsby-starter-blog basically contains Gatsby plugins for blogging using markdown, so markdownRemark(to parse markdown files) or imageSharp(to parse image resources) Are added, but if you don’t see these query types, you need to install and add a plugin like gatsby-transformer-remark.
If you roughly grasped Gatsby’s GraphQL interface by touching this and that on the __graphql page, it is now time to run the query directly using the useStaticQuery hook within the React component.
import { useStaticQuery, graphql } from 'gatsby';

const data = useStaticQuery(graphql`
  query MyQuery {
    markdownRemark(frontmatter: {title: {eq: "Test Post"}}) {
      frontmatter {
        title
        date
      }
    }
  }
`);

console.log(data);
{
markdownRemark: {
frontmatter: {
title: "Test Post",
date: "2020-05-09T12:57:08.000Z"
}
}
}Since the example useStaticQuery hook only provides a static query, as the name suggests, the above query only retrieves data whose frontmatter.title is exactly Test Post. If you try to pass a template string containing a variable as an argument to the graphql function, you get the following error.
Error: It appears like Gatsby is misconfigured.
Gatsby related `graphql` calls are supposed to only be evaluated at compile time, and then compiled away.
Unfortunately, something went wrong and the query was left in the compiled code.
In other words, even if you include a variable in the template string you use as a query, this variable is only evaluated at “runtime,” so Gatsby doesn’t know what value this variable will contain when compiling the code.
However, in order to create a blog post page, you must receive dynamic parameters through a URL such as /posts/2, and use this parameter to execute a query such as “Get the second post!“. In this case, the pageQuery is used.
Create pages with dynamic parameter
The most basic function of a blog is that different contents must be expressed in the same UI template.
In general, if these functions need to be implemented, the client receives and renders the data using the server’s HTTP API at runtime, or if the page requires SEO optimization, the server side rendering (SSR) server receives the data and then renders the rendered HTML. It is implemented by sending a response to the client.
But, as you know, Gatsby is a static site generator. Therefore, it is not a method to dynamically receive and process data at runtime when the application is running, but to generate the actual page file after receiving data from Gatsby using GraphQL at compile time.
If you don’t understand what this means, let’s take a look at the files in the public directory.
$ cd evan-blog/public/page-data && ll

drwxr-xr-x   3 evan  1525943656    96B  5 10 14:34 2017
drwxr-xr-x   5 evan  1525943656   160B  5 10 14:34 2018
drwxr-xr-x  10 evan  1525943656   320B  5 10 14:34 2019
drwxr-xr-x   7 evan  1525943656   224B  5 10 14:34 2020
drwxr-xr-x   3 evan  1525943656    96B  5 10 14:34 404
drwxr-xr-x   3 evan  1525943656    96B  5 10 14:34 404.html
drwxr-xr-x   3 evan  1525943656    96B  5 10 14:34 about
drwxr-xr-x  19 evan  1525943656   608B  5 10 14:34 categories
drwxr-xr-x   3 evan  1525943656    96B  5 10 14:34 dev-404-page
drwxr-xr-x   3 evan  1525943656    96B  5 10 14:34 index
drwxr-xr-x   6 evan  1525943656   192B  5 10 14:34 page
Since my blog post path is in the format /2020/05/09/blog-title/, So Gatsby created directories named 2020, 05, 09 and blog-title in the public/page-data directory at compile time. After that, create a file called page-data.json that contains HTML to render as a string in it again.
Rather than fetching data dynamically at runtime and rendering the contents of the page, it means that when compiling, one page file per post should actually be created. If you understand this difference, you can handle static site generators a little more comfortably.
This means that you do not have to fetch the data dynamically at runtime and render the contents of the page, but you must actually create one page file per post when compiling. If you understand this difference, you can handle static site generators a little more comfortably.
createPages API
Gatsby provides an API called createPages that allows users to freely create pages they want at compile time.
// gatsby-node.js
const path = require('path');

exports.createPages = async ({ graphql, actions }) => {
  // ...
}
The first argument, graphql, is the same one that is called when using GraphQL inside a React component, and the second argument, actions, is the same action we are talking about in Flux Architecture.
Gatsby manages state using Redux internally, and since all of Gatsby’s APIs take this action list as an argument, we are free to use these actions to give commands to Gatsby. Among them, the action called createPage is an action that can issue a command to create a page.
Now, we can think about this flow roughly.
- Using GraphQL, I get all the posts I’ve written.
- Create a page one by one by dispatching the
createPageaction while traversing the post data.- Profit!
Actually, it’s simpler so you don’t have to worry much about it. Then let’s create a post page.
// gatsby-node.js
const path = require('path');

exports.createPages = async ({ graphql, actions }) => {
  const { createPage } = actions;
  const template = path.resolve('./src/templates/Post.tsx');

  // 1. Get all the posts
  const allPostsQuery = await graphql(`
    allMarkdownRemark {
        edges {
          fields {
            path
          }
          node {
            id
          }
        }
      }
  `);

  // 2. Create a page file by traversing the post data.
  const { edges: posts } = allPostsQuery.data.allMarkdownRemark;
  posts.forEach(({ node }, index) => {
    createPage({
      path: node.fields.path,
      component: template,
      context: {
        postId: node.id,
      },
    });
  })
}
If you write the page file creation logic using the createPages API like this, Gatsby does the rest of the troublesome work, which is very convenient.
However, the createPage function simply creates a page file, and does not pass the post data to the Page.tsx component. Therefore, we can pass the customized data to the template component using the context option of the createPage function, and we need to use this context data in the template component to get the post data again.
// Post.tsx

export const pageQuery = graphql`
  query PostQuery($postId: String!) {
    markdownRemark(id: {eq: $postId}) {
      fields {
        path
      }
      frontmatter {
        title
        date
      }
    }
  }
`;

interface Props {
  data: any;
  pageContext: {
    postId: string;
  }
}
const PostTemplate = ({ data, pageContext }: Props) => {
  const { frontmatter } = data.markdownRemark;
  // ...
}
The variables passed to the component through the context option of createPage are injected into the pageQuery module inside the React component file.
If you look at my query, you can see that the variable postId is used in the query type markdownRemark as a parameter of the query, such as query PostQuery ($ postId: String!) {}. Through this process, we can create a page that can fetch data using dynamic values.
In addition, Gatsby supports various actions such as createRedirect and createNode, and you can also create interesting features by combining these APIs and actions. However, in fact, simple features such as pagenation, category, and tag page required for applications such as blogs can be implemented with just the createPage action.
The annoying parts
After learning the basics of Gatsby, I had to work on implementing all the features that were implemented with Hexo and the CSS styles provided by the Icarus theme. And it wasn’t a lie to spend my time here during this migration, so it was a tedious series of tasks.
Of course, implementing all the features now can take too long, so I tried to implement features first that people often use or existing features that affect SEO, but the fact that I still have a lot of code to write hasn’t changed. So I aimed to work a little steadily with patience.
Care about the connection with the existing link
One of the things to watch out for when migrating web services is that links to old pages shouldn’t die. For example, if the URL /posts/1 before migration was a link to a page where you can see post 1, this rule must be the same after migration also.
If this rule is broken, the user accessing the link will encounter 404 status. Since my blog post has already been shared through various channels, and is often linked as a reference post on another blog, I had no choice but to care about this part.
 If the existing link is not processed properly, the user will see the 404 page.
Also, problems may arise in the SEO aspect. If 404 status is returned from the old post link, the search engine bot will recognize the page as deleted, and the it can be disappear from the search results. If inevitably it is a situation where you need to change an existing link to another link, you must explicitly return the ‘301’ status code as a response to tell the search engine bot which link the /posts/1 has changed to.
Hexo provided a feature that automatically maps posts with the title yyyymmdd-{postTitle} to URLs in the form /yyyy/mm/dd/{postTitle}/, unfortunately Gatsby does not.
The gatsby-starter-blog starter basically gets the path of each post markdown file and uses it as a URL as a boilerplate, but this method is different from Hexo’s URL generation method. So I had to do extra work so that the posts had the same URL as before.
To do this, I wrote a simple code that creates a URL from the file path of each post and inserts it into the post node field with the key path.
// gatsby-node.js

exports.onCreateNode = ({ node, actions, getNode }) => {
  const { createNodeField } = actions;

  if (node.internal.type === `MarkdownRemark`) {
    const filePath = createFilePath({ node, getNode });
    const path = filePath.replace(
      /(?<=\/)(\d{4})(\d{2})(\d{2})(-)(?=.+)/,
      '$1/$2/$3/'
    );
    createNodeField({
      name: `slug`,
      node,
      value: filePath,
    });
    createNodeField({
      name: `path`,
      node,
      value: path,
    });
  }
};
The field of the node created through the createNodeField action is inserted into a field property, and it can be accessed like this.
const data = graphql`
  query PostQuery {
    markdownRemark {
      fields {
        path
      }
    }
  }
`;
Mapping the posts of these new blogs to have the same links as existing blogs wasn’t very difficult or complicated, but it was quite annoying because I had to work with care not to break even a single link.
Make it all by myself.
When I using Hexo, I rarely had to develop it myself because I used the functions provided by the theme or actively used plugins. However, the reason for this migration was my blog was too dependent on themes or plugins, so I choose to implement the necessary functions directly.
For example, I was rendering related posts using the hexo-related-popular-posts plugin before, but in the Gatsby ecosystem, I couldn’t find a useful one, so I implemented it myself like this.
import React, { useMemo } from 'react';
import intersection from 'lodash/intersection';
import { useAllPosts } from 'src/hooks/useAllPosts';

const RelatedPosts = ({ tags, currentPost }) => {
  const posts = useAllPosts();
  const relatedPosts = useMemo(() => {
    return posts
      // Filter out current post.
      .filter(post => post.frontmatter.title !== currentPost)
      // Finds duplicates between the tag of the current post and the tag of another post.
      .map(post => ({
        post,
        tags: intersection(post.frontmatter.tags ?? [], tags),
      }))
      // Filter out posts without duplicated tags.
      .filter(({ tags }) => tags.length > 0)
      // Sorts in descending order of the number of duplicated tags.
      .sort((a, b) => b.tags.length - a.tags.length)
      .map(v => v.post)
      // Only the top 5 posts with the most duplicated tags are filtered out.
      .slice(0, MAX_COUNT);
  }, [currentPost, posts, tags]);

  return (
    // ...
  )
}
In fact, it is quite simple logic because it is just simply finding the posts that have the most tags that overlap with the current posts.
It’s annoying to have to implement all of this, but on the other hand, it it means that the freedom to implement the desired features has also increased. So it is Ok.
There is no posting creation function in CLI.
Essentially, Gatsby isn’t dedicated to markdown blogs, it’s just a static site generator, so it doesn’t offer anything like post creation with CLI.
However, it is too bored work to manually create a directory every time, rename a directory, and create a posting file. So I decided to write a very simple script and use it.
<!-- example.md -->

---

title: $title
date: $date
tags:
categories:
thumbnail:

---
You can create a new posting file by simply creating an example file and loading it when creating a new posting file, and changing only $title and $ date to strings that you want.
After that, you can use NodeJS readline API to receive the title of the post through system input during runtime, and record the post creation time in this markdown file.
$ yarn new-post

yarn run v1.22.0
$ node ./scripts/newPost.js

Please enter the title of the posting.
Since this title becomes the URL of the posting, it should be written in English without spaces. >
 =>
Of course, you can also input category or tag data in the same way, but I didn’t add any related features because I felt it wasn’t very useful because I often changed categories or tags while writing a post.
Not only me, but other many developers are writing their own scripts to do this. Unlike my simple script, their scripts are nice and feature-rich, so let’s find them out.
Epilogue
When I first started migrating my blog, I thought it would take a month or so, but thanks to the Golden Holiday, the work ended faster than I thought.
Although the design feels a bit clunky and buggy compared to the previous version, it has evolved into the first goal, “Application that can be add any feature that I want”, so I am satisfied.
And during this migration, I removed Google AdSense from my blog.
This is because there was a small amount of revenue coming from advertisements, and I thought that advertisements could cause fatigue to users who visit my blog. (You can make money with stocks and real esta…MMF..MMPH)
Anyway, the start was to attach the i18n function to the blog, but suddenly I migrated, so it seems to be a Yak shaving. But as a result, I’m happy to get away from Hexo so I can make this and that blog easier.
관련 포스팅 보러가기
For Those Hesitating to Start a Blog
EssayWhat Leaders Should Really Worry About Isn't Productivity
Essay/CareerDevelopers Who Stopped Growing
EssayHow to Find Your Own Color – Setting a Direction for Growth
EssayWhy I Share My Toy Project Experience
Essay/Soft Skills