Using PayPal's Express Checkout RESTful API
How to Implement PayPal Payment Integration?

In this post, I want to write about how to use Express Checkout, PayPal’s RESTful API. Before proceeding, first you need to access the PayPal Sandbox website and create a sandbox account.
You can test with this account, and for actual production accounts, just sign up on the PayPal website.
What is Express Checkout?
It’s one of the payment flow methods PayPal provides. When users click the “Buy with PayPal” button, a PayPal login modal window is rendered, and payment proceeds through this flow. It supports all countries, and browser support is as follows:
| Internet Explorer | Chrome | Mozila Firefox | Safari | Opera |
|---|---|---|---|---|
| v9~ | v27~ | v30~ | v5.1~ | v23~ |
PayPal provides a total of 3 payment flows, and in Korea, you can choose between these 2 methods provided for All countries.
Paypal Standard
This method directly inserts buttons generated based on HTML code provided by PayPal into web client source code. You directly enter product name, product ID, price, etc. on the PayPal site, and it automatically generates button code accordingly. Then you insert that code into client source.
Express Checkout
This method dynamically renders buttons using checkout.js, PayPal’s JavaScript SDK. It proceeds by transmitting product data to your service’s server, then authenticating with PayPal servers in a Server to Server method. I chose this method.
Express Checkout Flow
This section was written referencing the Express Checkout section of the PayPal Developer page.
 Overall Express Checkout flow
Simply put, the UX is similar to the flow of logging in with Facebook or Instagram accounts.
When users click the purchase button, the PayPal login window opens as a popup on desktop and as a new tab on mobile, and users proceed with authentication and payment sequentially in that window.
After all flows are completed, users move to the URL sent as the redirect_url parameter to PayPal according to payment progress results, and finally see the page and payment information results according to success, failure, or cancellation.
There are 2 methods for communicating with PayPal servers: RESTful API and NVP/SOAP API, but this document will only describe the RESTful API.
The PayPal Express Checkout flow is as follows:
- User clicks the purchase button
- Express Checkout’s client SDK
checkout.jsopens a login modal, or the API server calls the PayPal API to initialize thepaymentevent. - After
paymentevent initialization, Express Checkout flow starts inside the modal.
- User proceeds with PayPal login
- User confirms payment information and clicks the
Continuebutton - When user clicks the
Continuebutton, they move back to the service’s redirect page and final payment information is displayed.
Product information parameters sent when creating payment information should be exposed at this stage.
5. Finally, the execute API is called and payment is completed. And the user is redirected to the service’s payment completion page.
Proceeding with Client Only
PayPal official documentation recommends dynamic loading using CDN to maximize version compatibility with Express Checkout. Downloading the
checkout.jsfile directly and putting it in client source is not recommended.
The version of
checkout.jsin this document proceeds with4.0.
The flow I’m writing now is a method that uses checkout.js to complete authentication and payment all at once directly from the PayPal server without going through my service’s API server.
On the client, define data and render the PayPal payment button using checkout.js. Clicking this button calls checkout.js’s built-in methods to automatically proceed with authentication, payment token creation, and payment completion all in one go.
First, for dynamic loading of the checkout.js SDK, I opened a script tag in the index.html file and wrote the following script.
(function() {
  var _DOM = document.createElement('script');
  _DOM.src = 'https://www.paypalobjects.com/api/checkout.js';
  var element = document.getElementsByTagName('script')[0];
  element.parentNode.insertBefore(_DOM, element);
});
Then write the PayPal button DOM and render the button using checkout.js.
<div id="pay-test-btn">Test to payment</div>paypal.Button.render({
env: 'sandbox', // Enter 'sandbox' for testing, 'production' for production
client: {
sandbox: 'paypal-sandbox-key', // Enter client_key issued by PayPal
production: 'paypal-production-key'
},
payment: function() {
var env = this.props.env;
var client = this.props.client;
return paypal.rest.payment.create(env, client, {
transactions: [{
amount: {
total: '10.00',
currency: 'USD'
}
}],
});
},
commit: true,
// When false, the last button text in the modal changes to Continue and doesn't proceed with payment right away but moves to redirect page.
// When true, it changes to Pay Now and payment proceeds right away
onAuthorize: function(data, actions) {
return actions.payment.execute().then(function(res) {
// On payment success, data comes in callback parameter res
console.log(res);
});
}
}, '#pay-test-btn');Then the PayPal button is automatically rendered on the #pay-test-btn DOM element we wrote earlier as shown below.
 The button shape became a bit strange but let's not worry about it...
If the button rendered normally, let’s proceed with test payment now. Clicking that button will open a window like below. This window can open as a popup, iframe, or new tab depending on whether the user’s environment is desktop or mobile.
PayPal calls this window the Light window, but for convenience in this post I’ll just call it “login modal”. After this, users proceed with payment following the login modal’s guidance, and when final payment is completed, they receive result values in the res parameter of the Promise Callback function in the onAuthorize method.

Proceeding with Client and Server Communication
This flow is a method of proceeding in order from PayPal authentication using the client_key and secret issued by PayPal.
The advantage of this method is that you can proceed with payment while maintaining your service’s UX flow as much as possible, the flow is more flexible than the first method, and button design is also freely customizable with CSS.
For that reason, PayPal also recommends this method. The payment flow is divided into 3 main stages.
- Authentication process to receive access token from PayPal server using
client_keyandsecret - Process to
createpayment - Process to
executepayment
First, the client must render a button and send a create request through this service’s API. At this time, the difference from the previous flow is that there’s no particular need to use checkout.js. First, render the button. For reference, I used AngularJS and md-material.
<div layout="row" layout-align="center center">
  <div layout="column">
    <md-button md-color="{background: 'blue-grey'}" ng-click="vm.postData()">
      TEST
    </md-button>
  </div>
</div>
After that, since duplicate logic will need to be written when PayPal payment is used on other pages, I defined a separate factory. It’s fine to implement it inside the controller without defining a separate factory. This factory communicates with my API server and then passes values back to the controller using Promise.
(function() {
  'use strict';

  angular
    .module('services')
    .factory('PaypalService', [
      '$rootScope', 'Restangular', 'SNS_KEYS', '$q',
      PaypalService
    ]);

    function PaypalService($rootScope, Restangular, SNS_KEYS, $q) {
      // Pre-stored in app.constants to use the key issued by PayPal globally.
      var clientKey = SNS_KEYS.paypal;

      /**
        * @public
        * @name create
        * @description create paypal payment request
        * @param { Object } data
        * @return { Promise }
        */
      function create(data) {
        var defer = $q.defer();
        data.clientKey = clientKey;
        data.redirect_urls = {
          return_url: location.origin + '/paypal/result', // Page to redirect to when payment completes
          cancel_url: location.origin + '/paypal/result' // Page to redirect to when payment is canceled, can be same as return_url
        };
        // API server's API endpoint
        Restangular.all('paypal/payments/create')
        .customPOST(data, undefined, undefined, undefined, {
          'Content-Type': 'application/json'
        }).then(function(res) {
          defer.resolve(res);
        }, function(err) {
          defer.reject(err);
        });

        return defer.promise;
      }

      /**
        * @name execute
        * @description execute paypal payment
        * @param { Object } data
        * @return { Promise}
        */
      function execute(data) {
        var defer = $q.defer();
        // API server's API endpoint
        Restangular.all('/paypal/payments/execute').customPOST(data, undefined, undefined, {
          'Content-Type': 'application/json'
        }).then(function(res) {
          defer.resolve(res);
        }, function(err) {
          defer.reject(err);
        });

        return defer.promise;
      }

      /**
        * @name getPaymentInfo
        * @description getting created paypal payment information
        * @param { Object } data
        * @return { Promise }
        */
      function getPaymentInfo(data) {
        var defer = $q.defer();
        // API server's API endpoint
        Restangular.all('/paypal/payments/detail').customGET('', data).then(function(res) {
          defer.resolve(res);
        }, function(err) {
          defer.reject(err);
        });
      }

      return {
        create: create,
        execute: execute,
        getPaymentInfo: getPaymentInfo
      };
    }
})();
Then in the Controller connected to the html file where the button was rendered, call the Paypal service defined above.
(function() {
  'use strict';

  angular
    .module('app')
    .controller('PaypalCreateController', [
      '$rootScope', '$scope', 'PaypalService',
      PaypalCreateController
    ]);

    function PaypalCreateController() {
      var vm = this;
      // Define dummy data for testing. In actual service, this data will be bound to forms.
      vm.paymentData = {
        transactions: [{
          amount: {
            total: '1.00',
            currency: 'USD'
          },
          description: 'This is the description',
          item_list: {
            items: [{
              name: 'test',
              description: 'This is test product',
              quantity: '1',
              price: '1.00',
              sku: '1',
              currency: 'USD'
            }]
          }
        }]
      };

      vm.postData = postData;
      function postData() {
        var data = angular.copy(vm.paymentData);
        // The reason for Deep Copy is because there may be cases where data needs to be modified before transmission,
        // and since Object types are basically Call by reference, modifying here would modify original data too.
        PaypalService.create(data).then(function(res) {
          // PayPal returns a total of 3 URLs
          // links[0] = GET method request URL to receive detailed values of just-created payment information
          // links[1] = Redirect URL of created payment page
          // links[2] = Payment execution URL
          // Listed in this order.
          window.location = res.result.links[1].href;
        });
      }
    }
});
At this time, the API server must have logic to communicate with PayPal servers using values sent from the client to proceed with authentication. My API server is built with Laravel 5.x.
namespace App\Http\Controllers;

use Log;
use Illuminate\Http\Request;
use App\Http\Requests;
use App\Http\Controllers\Controller;
use GuzzleHttp\Client;

class PaypalPaymentController extends Controller {
    public $client;
    public $paymentUrl;
    public $accessToken;

    public function __construct() {
        $this->client = new Client();
        // Get access token value issued by PayPal from env
        $this->accessToken = env('PAYPAL_ACCESS_TOKEN_SANDBOX');
        // Since we're testing now, we're sending requests to sandbox url. For actual service, remove sandbox and send to api.paypal.com.
        $this->paymentUrl = "https://api.sandbox.paypal.com/v1/payments/payment";
    }

    public function detail(Request $request){
        $query = $request->query();
        $response = $this->client->request('GET', $this->paymentUrl.'/'.$query['paymentId'] , [
            'headers' => [
                "Content-Type" => "application/json",
                "Authorization" => $this->accessToken,
            ],
        ])->getBody()->getContents();
        $decodeResult = json_decode($response);

        return response()->success($decodeResult);
    }

    public function payment(Request $request) {
        $response = $this->client->request('POST', $this->paymentUrl, [
            'headers' => [
                "Content-Type" => "application.json",
                "Authorization" => $this->accessToken,
            ],
            'json' => [ // Request Body to send to PayPal server, must be identical to parameters written on PayPal official site.
                "intent" => "sale",
                "redirect_urls" => $request->redirect_urls,
                "payer" => [
                    "payment_method" => "paypal", // Korea only supports paypal method
                ],
                "transactions" => $request->transactions, // Payment information sent from client
            ]
        ])->getBody()->getContents();
        $decodeResult = json_decode($response);

        return response()->success($decodeResult);
    }

    public function execute(Request $request){
        $response = $this->client->request('POST', $this->paymentUrl.'/'.$request->paymentId.'/execute' , [
            'headers' => [
                "Content-Type" => "application/json",
                "Authorization" => $this->accessToken,
            ],
            'json' => [
                "payer_id" => $request->PayerID,
            ]
        ])->getBody()->getContents();
        $decodeResult = json_decode($response);

        return response()->success($decodeResult);
    }
}
Now when clicking the test button on the client, payment data is transmitted to my API server through the API I predefined called /paypal/payment/create, and the API server communicates with PayPal servers again with that data and returns results to the client. Then the client just opens the redirect page contained in link[1] of the returned data and payment starts!
I’ll explain why it’s link[1] again below.
After this, users move to either the login page or payment confirmation page depending on PayPal login status, and when clicking the Continue button in PayPal’s payment confirmation window, they land on the redirect_url page we sent through the create API earlier.
At this time, PayPal sends data that the user has completed final payment confirmation and payment can now start, attached as a query string after the redirect_url.
Now all basic client and server logic is ready! Explaining the overall flow again, it’s as follows:
- Client sends payment creation request to API server.
- API server sends payment creation request to PayPal server again with received data, then returns values to client.
- Client redirects user to
redirect_urlin returned data. - Then user completes login and brief payment information confirmation on the moved PayPal page and clicks the
Continuebutton. - When
Continuebutton is clicked, PayPal redirects user to theredirect_urlcontained in the payment creation request. - Then user confirms detailed payment information before final payment on the redirected page.
- When user clicks the “final payment” button, client sends payment execution request to API server.
- API server passes this request to PayPal server again and returns values to client.
- User is redirected again to the corresponding page according to payment execution result.
It looks very complicated, but looking closely, the API server is basically just a communication shuttle.
Then you might think “Can’t we just communicate directly with PayPal servers?” but this is a problem directly connected to security. To communicate with PayPal servers, you need client_key and secret, and communicating directly with PayPal servers without mediating through the API server means the client must have both these values.
But as you know, client source on the web is easily exposed, and even with obfuscation, String variables like Object keys are not obfuscated, so malicious users can easily steal client_key and secret. So you store secret on the relatively safe server and store only client_key on the client, splitting the two values so they can’t be seen at once.
Execution Results
First, as a result of proceeding with the create request through the API server, I was able to receive the following response.

I received an array called links, and the meaning of each index is:
0 - URI of API where payment’s detailed information can be checked with GET method
1 - URL that redirects to PayPal’s payment page
2 - URL that can execute payment
Now you can understand the meaning of links[1] explained above. And looking at the host of the sent URLs, they all start with sandbox.*, meaning we’re currently testing using a sandbox account. In actual production API, that sandbox part is removed.
And now if we redirect to the URL of links[1], naturally(…) those values will disappear into dust. You could store them in cookies or use them somehow, but since they’ll be sent again anyway, let’s throw them away without regret.
I tried opening that page as a popup without redirecting, and could see the payment information gloriously perish while spitting out 401 Unauthorized…
But anyway, at the point when the create request was sent to PayPal, the redirect_url value I initially sent is stored on the PayPal server, so when the user completes payment confirmation on the PayPal page, control returns to my service again.
Now let’s try redirecting.
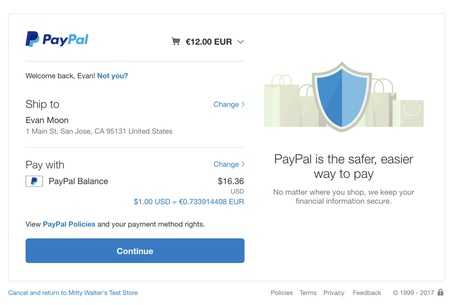
Then this screen appears. If you’re not logged into PayPal, you’ll first move to the login page, and after login completes, you’ll move to this page.
On this page, users can check the amount they’ll pay, and clicking the cart icon in the upper right shows more detailed information, though it’s written so briefly it’s hard to read, so there’s not much meaning.
And the currency unit I sent in the request was a product registered in euros, but PayPal automatically converts to the user’s country’s exchange rate. Now when the user checks all items and clicks the Continue button, movement to the redirect_url I sent during initial create starts.
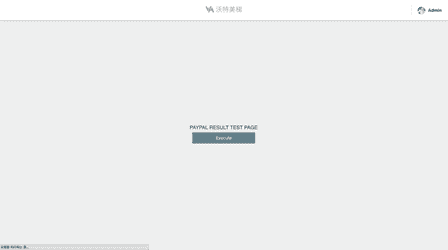
This page is one I temporarily made for testing, and if it were an actual production server, this page would be the last page where information can be confirmed before final payment. What should be noted at this time is this page’s URL.

As query strings, PayPal sent paymentId, token, and PayerID. Now using those values, proceed with the next flow.
This page’s Controller consists of methods with logic to receive detailed payment information and execute payment using those values. If you don’t remember the Paypal service logic defined above, go back and look at it again.
(function() {
  'use strict';

  angular
  .module('app.pages.product')
  .controller('PaypalRedirectController', [
    '$rootScope', 'Restangular', 'PaypalService', '$location',
    PaypalRedirectController
  ]);

  /** @ngInject */
  function PaypalRedirectController(
      $rootScope, Restangular, PaypalService, $location
  ) {
    var vm = this;
    var queryString = $location.search(); // Get query string sent by PayPal

    vm.init = (init)();
    function init() {
      getPaymentInfo();
    }

    /**
     * @public
     * @method executePaypal
     */
    vm.executePaypal = executePaypal;
    function executePaypal() {
      // Actual payment execution method
      PaypalService.execute(queryString).then(function(res) {
        console.log('EXECUTE RESULT -> ', res);
      });
    }

    /**
     * @private
     * @method getPaymentInfo
     */
    function getPaymentInfo() {
      // Method to receive payment information
      PaypalService.getPaymentInfo(queryString).then(function(res) {
        console.log('GET PAYMENT INFO -> ',res);
      });
    }
  }
})();
I hooked the excutePaypal method as a click event on the button on that page.
Now when the user clicks that button, final payment is executed and results can be received as response.
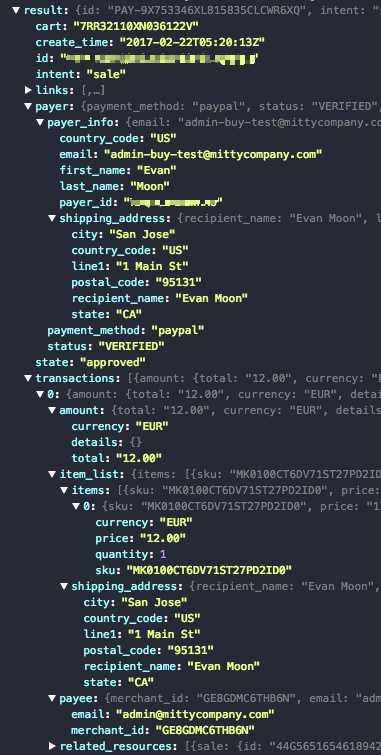
Payment proceeded normally and this is the result sent by PayPal server. If payer.status is approved, payment was approved normally. Now it’s time to check whether payment was actually approved and money came in properly.
Accessing PayPal’s sandbox page and checking with the buyer account, you can see that 12 euros was withdrawn normally in the purchase history. The seller account also shows that 12 euros came in normally.
 Sandbox's purchase test account. 12 euros were withdrawn.
 Sandbox's sales test account. 12 euros came in with my name at the top.
But since complete processing hasn’t been done yet, Payment status is Unclaimed. It’s not cashed yet, just a piece of data sitting on the PayPal server.
Now when clicking the Accept button to proceed with deposit to the seller’s account, the status changes to Completed and 12EUR is deposited converted to USD into the account.
That’s all for this post on Express Checkout.
관련 포스팅 보러가기
[Implementing Gravity with JavaScript] 2. Coding
Programming/Graphics[Implementing Gravity with JavaScript] 1. What is Gravity?
Programming/Graphics[Simulating Celestial Bodies with JavaScript] Implementing Planetary Motion
Programming/Graphics[Simulating Celestial Bodies with JavaScript] Understanding the Keplerian Elements
Programming/Graphics[JS Prototypes] Implementing Inheritance with Prototypes
Programming/JavaScript