Basic Git for Newbies - Version Management
Branches, Merge, Rebase – Essential Git Version Control Concepts

In this post I want to study some more concepts and commands beyond the basic commands I explained in the previous post Basic Git for Newbies - Getting Started.
While the previous post focused on cloning source from remote servers, modifying it, and updating the remote server again, this post will cover more about Git’s main topic: version management.
So like the previous post, I’ll explain some simple terms and concepts first, then explain commands to use those concepts.
Understanding Terms and Concepts
Git presents several concepts for efficiently managing versions. HEAD meaning your current version state, Branch as a workspace, Merge and Rebase for combining branches, etc.
And using these features, you sometimes encounter Git errors - I remember when I first started working as a developer, errors from Git scared me more than coding errors.
Honestly, errors from coding are easy or hard to fix but I just fix them and they’re resolved, but errors from Git felt scary like if I mess around trying to fix them, the source might pulverize and fly away.
But thinking back now after using Git for about 6 years, I was more scared because I didn’t know Git well. I didn’t know exactly what would happen to the source when I used some feature, so I had those worries. Some readers probably have similar experiences or thoughts, so I’ll try to explain Git concepts I know as understandably as possible.
Merge Conflict
I think the error you encounter most when using Git is probably merge conflict. Literally translated to Korean it’s “병합 충돌” but everyone says “got a merge conflict” or just “got a conflict.”
Merge conflicts are a bit ambiguous to call errors but they’re not normal situations anyway, so when you first encounter them they’re very confusing and hard to understand. Conflicts are literally situations where source collides, so they equally happen to juniors and seniors, and equally confuse everyone.
Because conflicts aren’t logical errors but situations where my work and someone else’s work collided, it’s often hard to resolve alone. So let’s look at an example that could occur in actual collaboration situations to understand exactly what conflict - collision - means.
Cheolsu and Younghee were asked by their boss to create and manage a list of late people. So Cheolsu and Younghee started managing late people with the following text file.
July 25 Late List

Nayeon
Chaeyoung
Sana
Tzuyu
Now Cheolsu and Younghee were given authority from their boss to manage late people and must enter late people in this file daily. But Cheolsu and Younghee don’t get along well so they proceed with entering late people by modifying the file however they want without communicating.
Then Cheolsu and Younghee received information from their informants planted in the office that the third late person on July 25, “Sana,” wasn’t actually late. But the problem was the information these informants brought was different.
Cheolsu’s informant: Hey, you know the person who was late on July 25? It wasn’t Sana, it was Mina!
Younghee’s informant: Younghee, on July 25 it wasn’t Sana who was late, it was Jihyo?…
They trust their informants 100%, so they immediately started modifying the late list file.
| Time | Cheolsu | Younghee |
|---|---|---|
| 1 | Changed Sana to Mina in late-list.txt |
Changed Sana to Jihyo in late-list.txt |
| 2 | Committed and pushed changes to remote repository | Still working |
| 3 | Cheolsu left work >_< | Finished work and attempted to push to remote repository |
| 4 | Error saying remote repository state updated so Pull first. Huh? | |
| 5 | Pulled remote repository changes to local | |
| 6 | Cheolsu’s modifications and Younghee’s modifications collided! |
From https://github.com/evan-moon/conflict-test
 * branch            test       -> FETCH_HEAD
Auto-merging late-list.txt
CONFLICT (content): Merge conflict in late-list.txt
Automatic merge failed; fix conflicts and then commit the result.
When someone else and I modify the same part like this, Git has no way to know which source is correct. In such situations Git just marks which parts conflicted and tells the user, then leaves the rest for the user to fix - this situation is merge conflict.
Working on the same branch like Cheolsu and Younghee means continuously sharing history of source changes. In other words, you must periodically Pull what the other person worked on from the remote repository and merge it into your local branch, and conflicts are likely to occur during this process.
July 25 Late List

Nayeon
Chaeyoung
<<<<<<< HEAD
Jihyo
=======
Mina
>>>>>>> 35058b46325bb61112efd52f4019f907c561328d
Tzuyu
Here the upper part between <<< HEAD and === is content I modified in the current branch. Younghee changed Sana to Jihyo so the name Jihyo appears in that part.
And the content between === and >>> commit hash tells you which commit’s modifications conflicted. In this example it would be where Cheolsu changed Sana to Mina.
Git is just a friend who manages versions, so in such situations it doesn’t know business history like “Sana wasn’t actually late so we had to change to someone else.” So naturally Git can’t know which source is correct. So it leaves the choice to the user. In this situation Younghee has three choices:
- Ignore Cheolsu’s changes
- Ignore my own changes
- Reflect both changes
Usually in such situations you should call Cheolsu and ask why he added Mina instead of Sana before deciding, but Younghee doesn’t get along with Cheolsu so she might just blow away Cheolsu’s commit.
Why Use Multiple Branches
I briefly explained the basic Branch concept in the previous post. Since I already mentioned basic branch concepts in the previous post, this time I want to talk about “why should we use multiple branches?”
Basically Git was made assuming not solo work but collaboration situations where multiple people work together. No matter how much Git is a distributed version management system that distributes and manages source with remote and local repositories, when multiple people are modifying the same application’s code at once, merge conflicts like I just explained above occur frequently. So users usually divide workspaces by topic with branches and manage history.
Even dividing branches like this, you eventually must merge source someday so there’s still probability of conflicts, but at least you can greatly reduce continuously fixing conflicts throughout work.
So developers wonder “how can we efficiently manage multiple branches?” and this is where branch strategies come in. Among branch strategies there’s the representative Git flow, but this is just one famous strategy so each organization can decide which branch strategy to take.
So let’s briefly look at Git flow, a representative branch strategy, to understand what branch strategies are.
Strategic Branch Management, Git flow
Git flow basically starts with master and develop branches. Here master should always have the state of currently operating source, and you absolutely cannot commit directly to the master branch. And the develop branch is the branch the team is currently developing. And from the develop branch you create feature branches for each feature under development and conduct actual development.
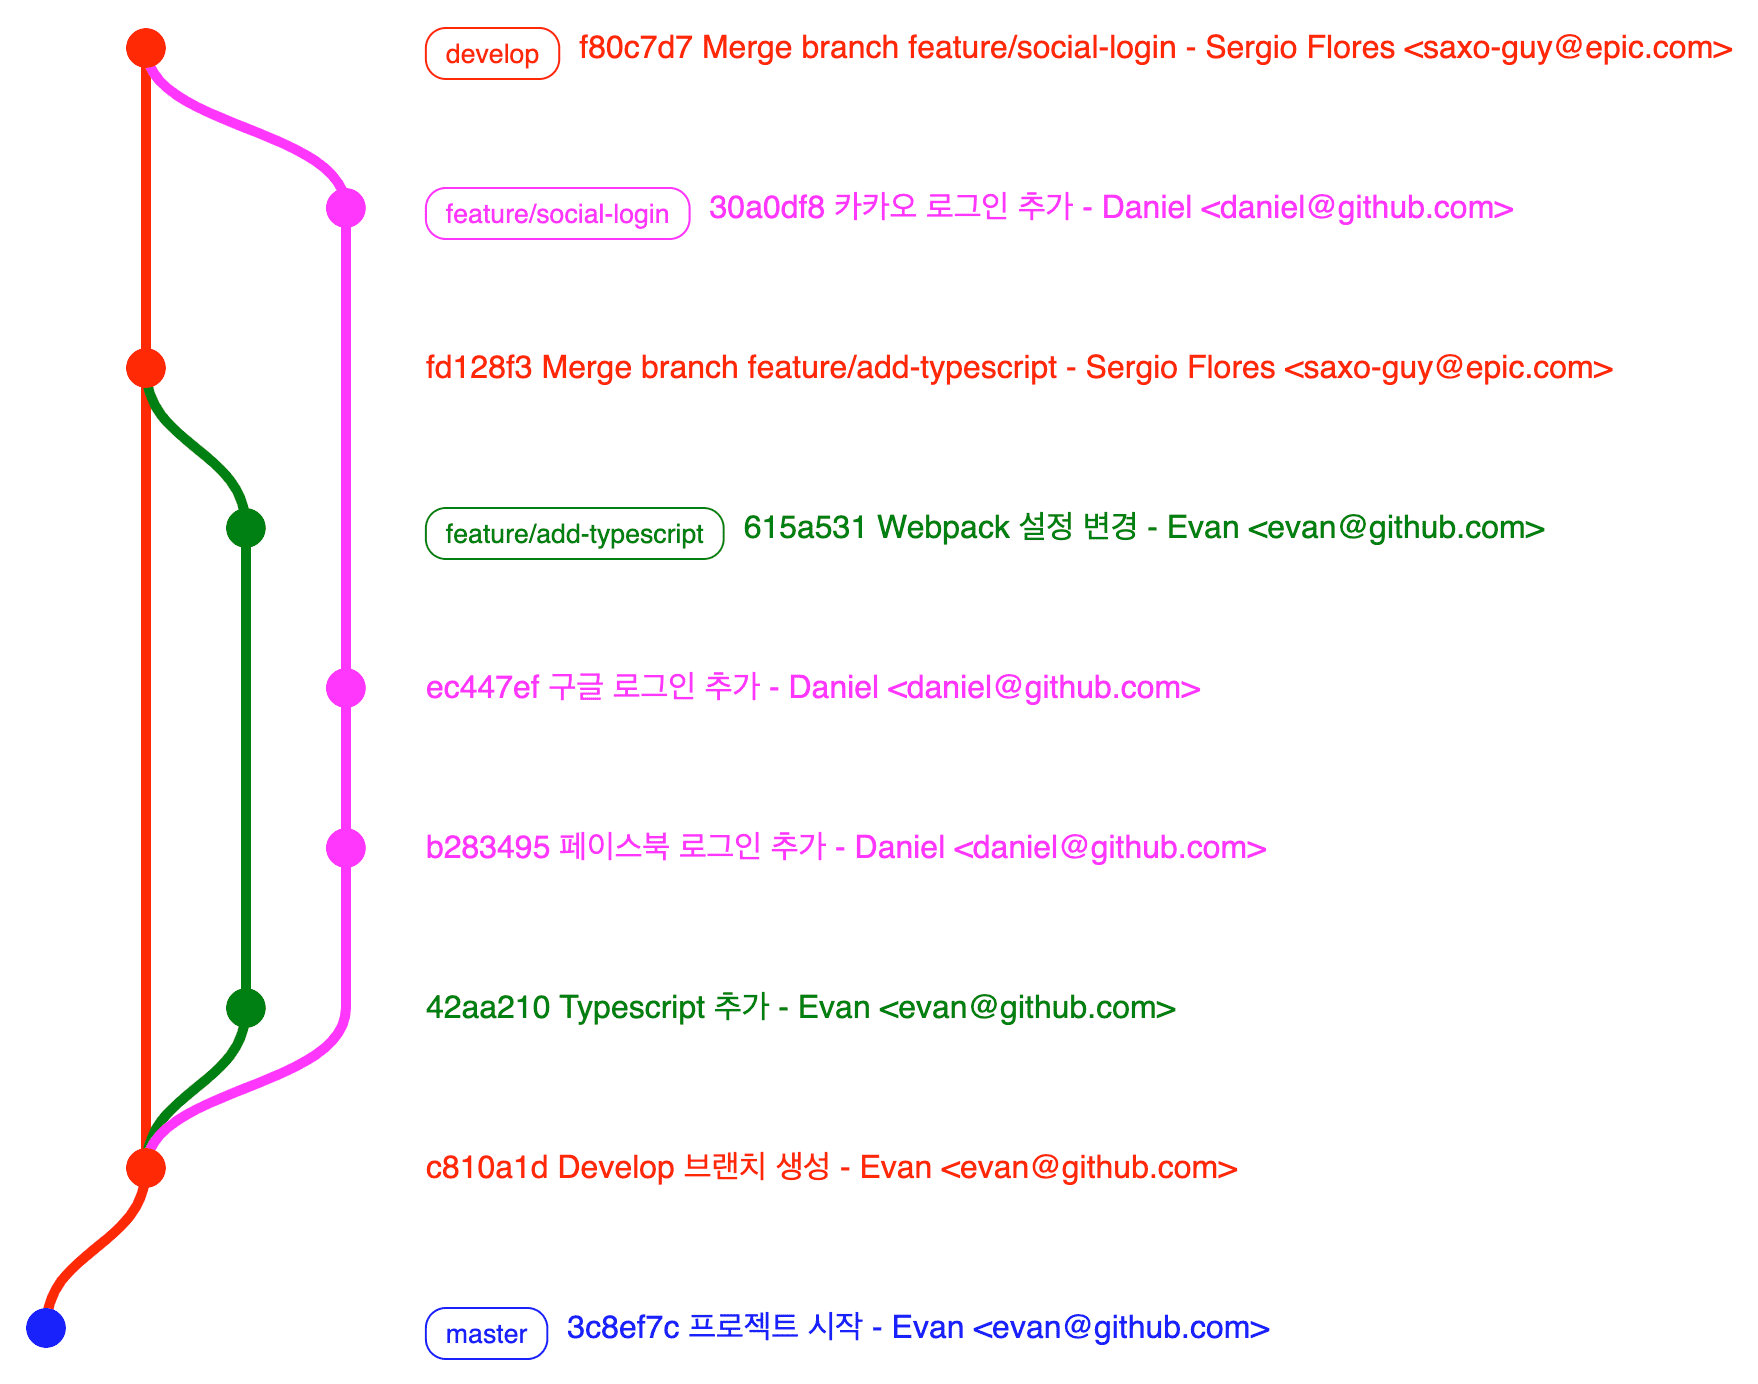
This graph’s content might not show well on mobile, so I’ll explain by coloring branch names.
Looking at this graph, after a commit marking the project start was made to the master branch, the develop branch was created, and you can see branches responsible for feature development branching from the develop branch.
Evan creates the feature/add-typescript branch and works on attaching TypeScript to the application, while Daniel creates the feature/social-login branch and works on social login integration. Then you can see them sequentially merging those branches into the develop branch as development finishes.
Since Daniel’s merge timing into the develop branch is later than Evan’s, if Evan and Daniel changed the same part, conflict occurs here. But at least while Evan and Daniel are each developing features, conflicts don’t occur so they can focus more on feature development.
Continuing development like this, when deployment time comes, you create a release branch from the master branch. At my workplace we follow a naming convention like release/release-1.0.0 marking the deployment version in the branch name. This release branch is purely for deployment only, so it’s discarded after that version’s deployment finishes.
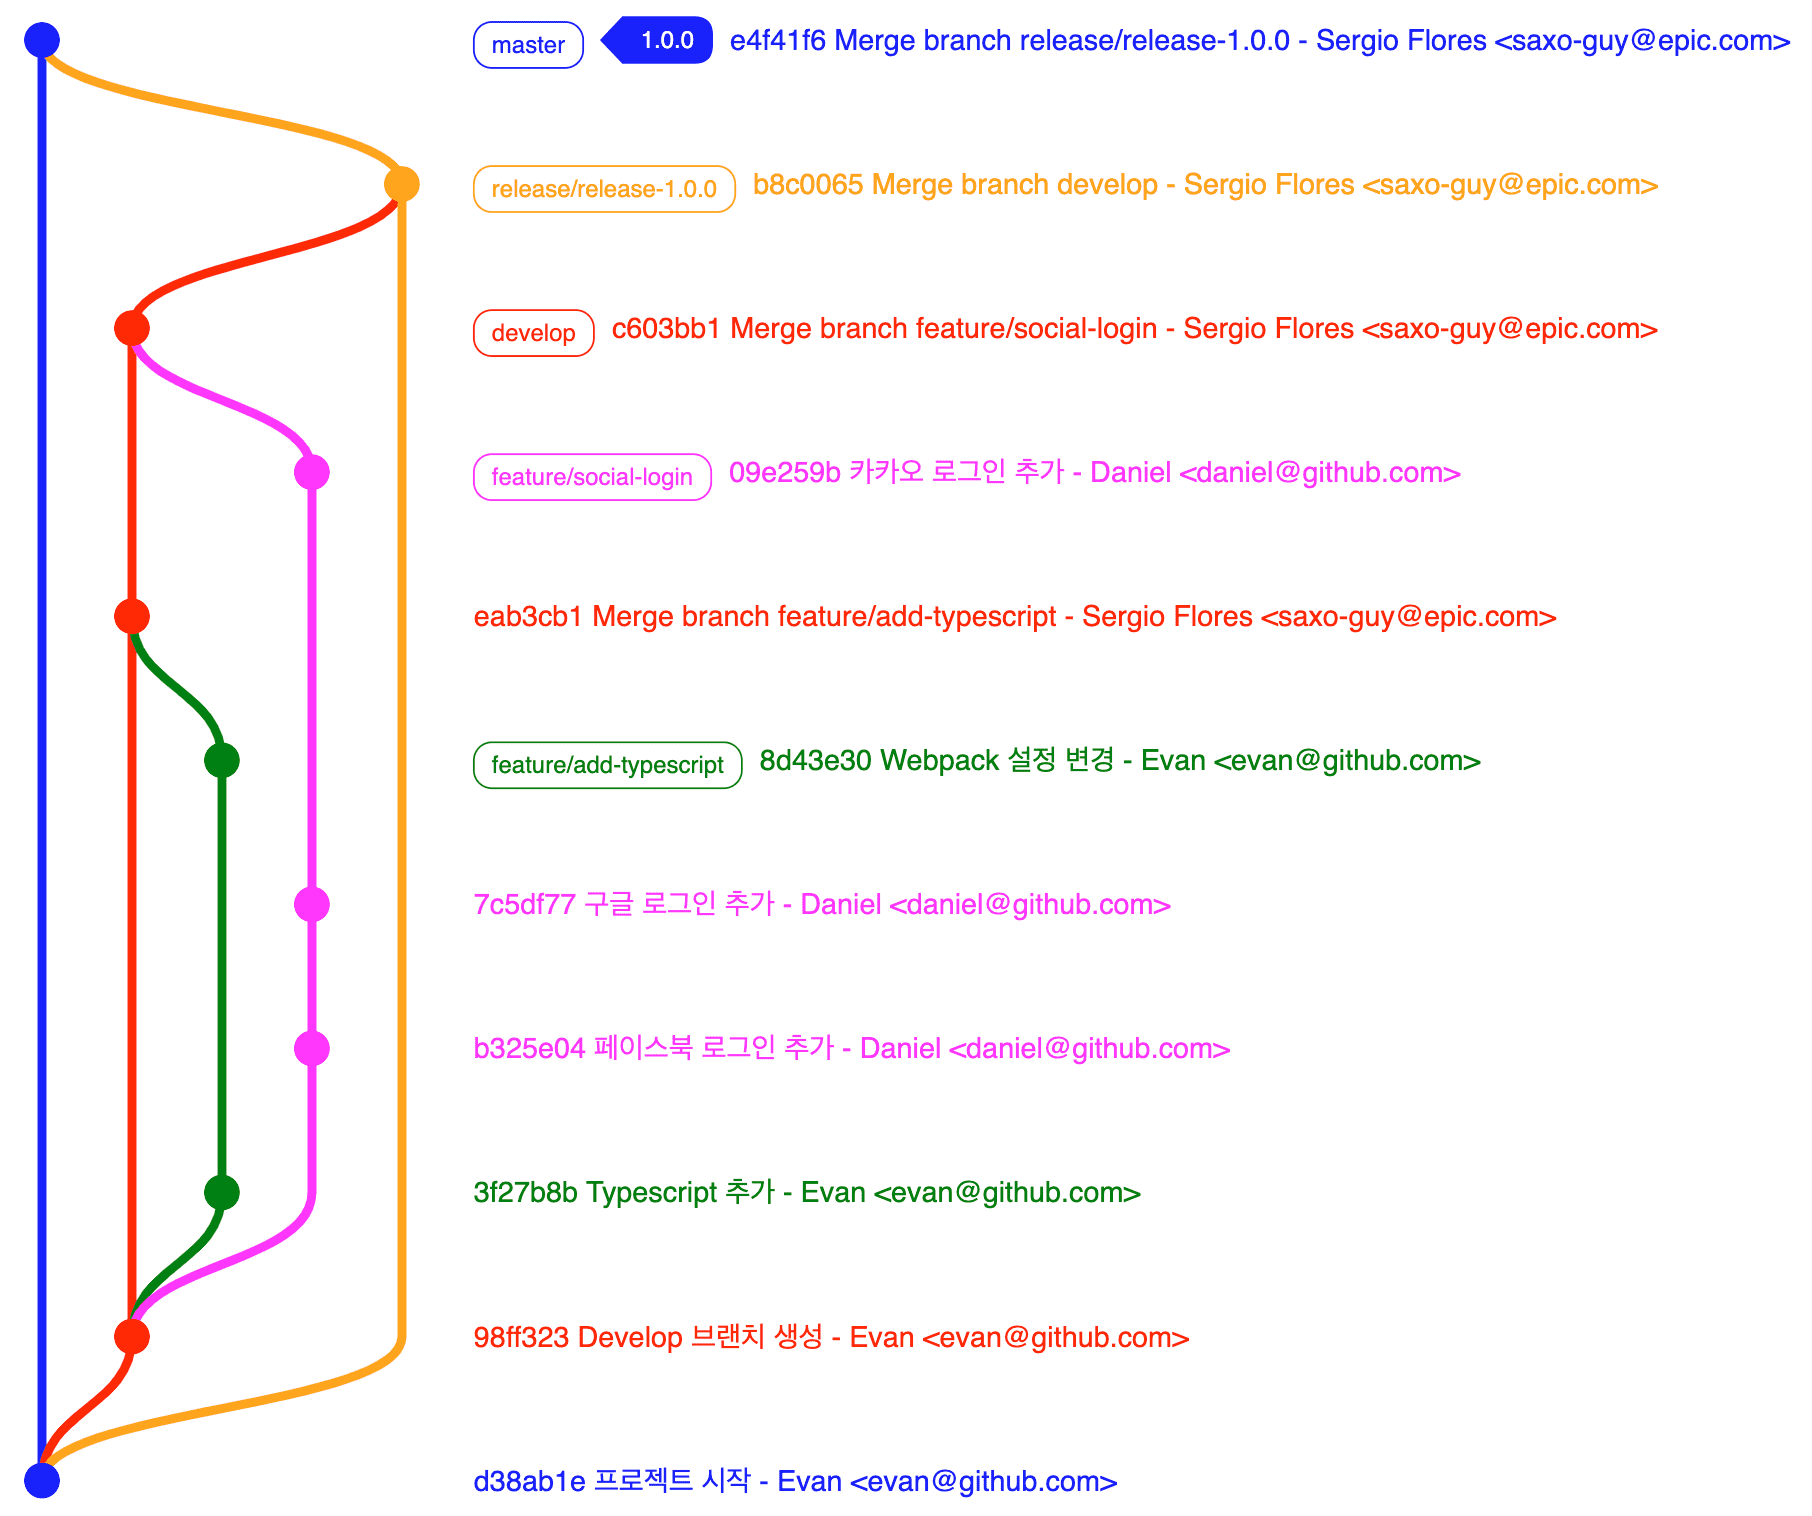
Development finished and to deploy version 1.0.0, we created a release/release-1.0.0 branch from the master branch.
Then we merge the develop branch with features to be deployed in the next version into the release/release-1.0.0 branch, conduct final testing like deploying to staging server, and if all organization members agree to deploy that version, we merge that branch into the master branch and tag with the version name.
Some might wonder here:
Then what about hotfixes? If you branch from develop you must wait until current version’s feature development finishes…
In such cases, if you branch a hotfix from the develop branch and merge to master then urgently deploy, features in the develop branch that shouldn’t be deployed yet get deployed too, so hotfixes exceptionally can branch from master and merge back to master.
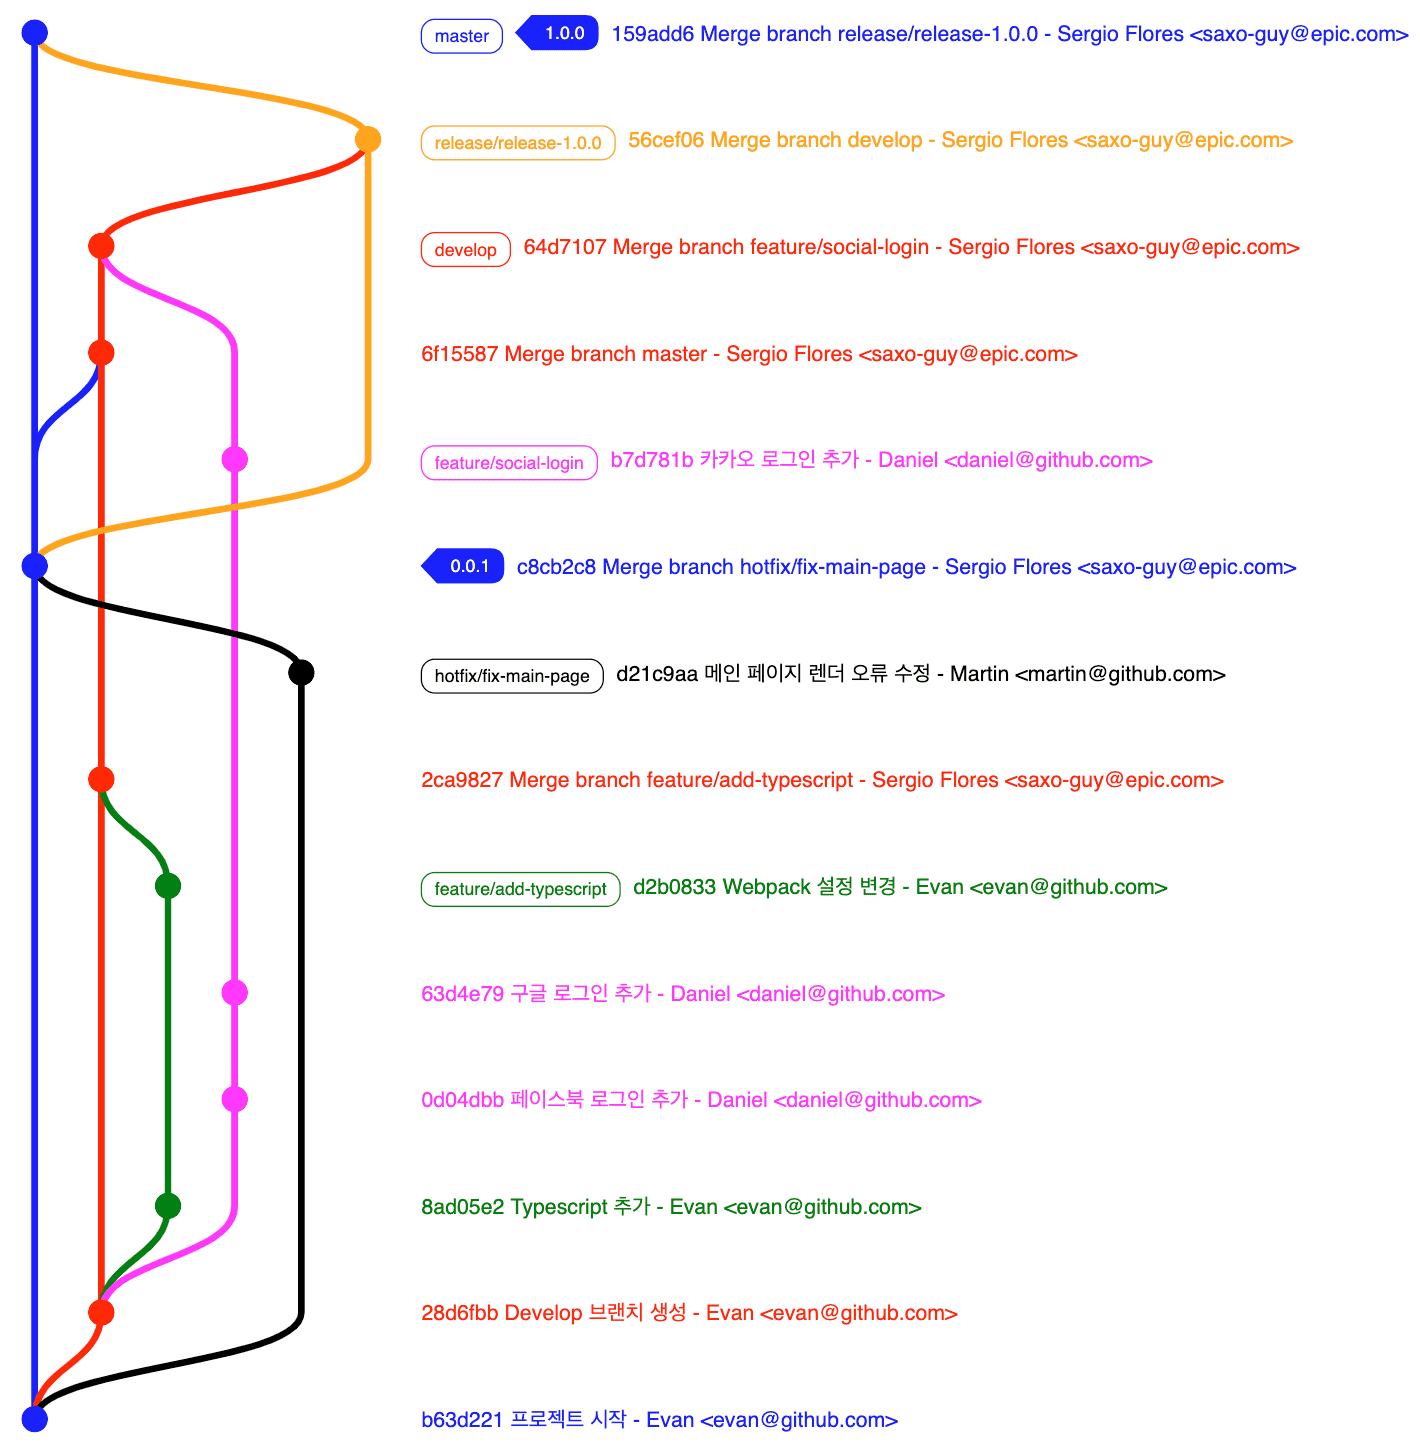
The graph got a bit complex but focus only on the black line hotfix/fix-main-page. You can see it branches from the master branch, gets one commit, and merges back to the master branch. Since this is a hotfix release not a formal release, we tagged version 0.0.1 following Semantic Version rules.
Since the hotfix/fix-main-page branch was merged and deployed, that means the source currently running in production changed, so we must reflect those changes in the develop branch too.
So hotfix handlers should directly update the develop branch after deploying. And it’s even better to inform colleagues “hotfix deployment just finished so please Pull the develop branch in your working branches to update~”
Of course, some organizations work fine without such complex branch strategies. But as developers touching the same source increase, without any rules smooth collaboration might be difficult, so most sizable organizations proceed with version management by establishing branch strategies fitting their situations.
If you understand why not to operate just one branch, let’s look at some more useful features to play with these branches and version histories.
Let’s Merge Two Branches
Continuing work on separate branches, the day to merge two branches eventually comes. Merging two branches is called branch merge.
Git provides three distinctive branch merge features: Merge, Merge and Squash, Rebase. Ultimately all three commands merge two branches, but they merge differently and leave different version histories, so using these features appropriately can make you a Git expert loved by teammates.
Merge
Merge is the most basic branch merge feature, reflecting all changes from the target branch into the destination branch while leaving a merge commit.
$ git checkout master
$ git merge feature
Many people already know regular merges so I won’t explain deeply and will pass quickly.
Merge squash
Now let’s look at the --squash option of the merge command used when merging two branches. The --squash option is an option to merge a commit integrating the entire branch’s commits into the target branch.
$ git checkout master
$ git merge --squash feature
Regular merge merges into the target branch with all commits from the merged branch remaining, but merge squash collects all commits from the target branch, combines them into one commit, and merges into the target branch.
Actually this feature’s correct name is Merge “and” Squash. In other words, squash is also an independent concept like merge. Since squash is a concept of combining multiple commits, it’s also used with the rebase command described below to combine current branch commits.
$ git rebase -i HEAD~~The above command means to change history from HEAD to HEAD’s ~~(two commits before). Entering this command executes vim and displays content like below:
pick 9a54fd4 Add commit description
pick 0d4a808 Add pull description

# Rebase 326fc9f..0d4a808 onto d286baa
#
# Commands:
#  p, pick = use commit
#  r, reword = use commit, but edit the commit message
#  e, edit = use commit, but stop for amending
#  s, squash = use commit, but meld into previous commit
#  f, fixup = like "squash", but discard this commit's log message
#  x, exec = run command (the rest of the line) using shell
#
# If you remove a line here THAT COMMIT WILL BE LOST.
# However, if you remove everything, the rebase will be aborted.
#
Changing the pick character at the front of commits in the above text to s or squash combines the two commits.
Rebase
Rebase, like Merge, is a feature that can merge branches into other branches. But the difference from merge is the merging method. Merge is literally a feature combining two branches into one, so it’s identical to pushing all changes from branch A into branch B. So merging branches using merge inevitably leaves merge commits.
$ git checkout feature
$ git merge master
[Source] https://dzone.com/articles/merging-vs-rebasing
So merge has the advantage of easily knowing from commits at which point which branch was merged. However, the disadvantage is creating unnecessary commits. This disadvantage doesn’t appear when there aren’t many working branches, but with many branches you might later see commit logs covered with merge commits.
On the other hand, rebase isn’t simply merging but literally changing the branch’s base. If you rebase the feature branch from the earlier example to master, history is recorded as if the feature branch’s changes were master’s changes.
$ git checkout feature
$ git rebase master
[Source] https://dzone.com/articles/merging-vs-rebasing
Rebase’s advantage is making clean commit history. Since no merge commit remains and history remains as if modified in master from the start, you can see pretty history falling cleanly in a line. But rebase’s disadvantage is problems arising from this commit insertion.
 [Source] https://dzone.com/articles/merging-vs-rebasing
Suppose I rebased the feature branch to master.
Here, commits reflected in master after I created the feature branch all move to the end and feature branch commits get inserted in the middle. In other words, the master state I’m seeing has history with feature changes reflected, but other people’s master is still working with old master history.
So we must forcibly merge the two masters - merging itself is done by using the --force option when pushing, but the problem is this is a very confusing situation. Simply put, commit history gets tangled and it’s the perfect situation to hear “Huh? Why is this? Why won’t it push?” from around the office.
So some use merge squash for merging to master and rebase when merging to develop. Merge creates merge commits and advances history into the future so this problem is less likely, but rebase changes the past so problems arise easily.
Well, both have pros and cons so choose well when using them.
Cherry Pick
Cherry Pick is a feature bringing just one commit from another branch into my branch. Looking at what cherry pick does, it feels like bringing one commit from the target branch and merging into the current branch, but looking at history it’s not a merge picture but recorded as that commit copied as-is and committed to my branch.
$ git checkout master
$ git cherry-pick 35058b4 # Commit hash to bring
Of course when using cherry pick there’s possibility of conflicting with current branch source, so be mentally prepared to fix conflicts before bringing. Cherry pick is surprisingly useful when used well, exactly because of situations like this:
- Cheolsu developing feature in branch A
- Younghee developing feature in branch B
- Designer asks Younghee to change review star icon and design
- Younghee reflects designer’s requirements in branch B
- But branch A must deploy before branch B
- Designer asks Cheolsu why review star design isn’t reflected in branch A
The best situation would be Cheolsu reflecting the designer’s requirements, but working frantically, things don’t always flow smoothly so such problems occur.
Here Cheolsu can easily solve this situation by cherry-picking the commit where review star icon was modified from branch B where Younghee is working to branch A. Such awkward situations occur more often than expected, so I recommend getting familiar with cherry pick.
Actually this situation happened to me recently where Cheolsu was me and Younghee was a fellow frontend developer. So we looked at branch B’s commit log with my colleague developer, but there were only commits with other changes mixed in, not commits with only review star icon modifications, so I had no choice but to negotiate with the designer and safely passed with the conclusion “then please reflect it all together when branch B deploys~” (Thank you designer…)
Let’s Temporarily Save Work in Progress
Stash
Stash is a command that can temporarily save current work changes to a stack. This command can be usefully used when you have unfinished work but need to checkout to another branch.
$ git stash # Save current changes to stack
$ git stash list # Check stash list
$ git stash apply # Reload most recent stash
Or you can directly specify stash names. If you don’t specify stash names, you can only bring stashes in stack entry order (First In Last Out), so I recommend specifying names. I usually specify stash names identically to branch names.
$ git stash branch-name # Specify stash name as branch-name and save to stack
$ git stash apply branch-name # Bring stash with branch-name name
Actually when developing at work, urgent bug fixes suddenly come in or POs reorganize issue priorities so you must move from your working branch to another branch quite frequently. (Especially bug fixes…) If you commit your work as-is to move to another branch, it can hurt other teammates developing together in that branch, so always stash changes.
Reverting Already Committed Content
When developing, sometimes you must revert commits. I’ve usually seen such situations occur due to mistakes, most often seeing features that shouldn’t be deployed squeezed into release branches. In such situations, manually finding and deleting that feature’s code by hand is too dangerous, so we revert commits using Git. The features used here are Reset and Revert.
Reset
Reset returns to the specified commit time. Think of it as rewinding time. In other words, using reset makes all history after the specified commit disappear. For example, think there’s history like this:
* 19061e7 - Got dumped by girlfriend for finding a bad restaurant.
|
* e50aff9 - Girlfriend says it's not tasty.
|
* 2d57c29 - Ordered aglio olio.
|
* c04f8f6 - Visited the restaurant I found.
|
* 7d9d953 - Found a good restaurant to visit with girlfriend!
I found a good restaurant to visit with my girlfriend and ordered aglio olio with anticipation, but it was too greasy and tasteless so I ended up getting dumped by my girlfriend.
So I’m so sad I want to erase the memory and return to before ordering aglio olio. The command I can use here is reset. Specifying the commit to return to deletes all history after that commit and returns to the past.
$ git reset --hard c04f8f6

# Returned to when I visited the restaurant!
* c04f8f6 - Visited the restaurant I found.
|
* 7d9d953 - Found a good restaurant to visit with girlfriend!
We can use three options when using the reset command: hard, soft, mixed. These options all delete history identically but handle deleted content slightly differently.
- hard: History after specified commit is deleted and deleted content disappears as-is.
- soft: History after specified commit is deleted and deleted content moves to stage. (Changed to added state)
- mixed: History after specified commit is deleted and deleted content becomes unstaged. (Must add again)
Since I just used the hard option above, I could cleanly delete all memories after the restaurant visit commit that I wanted to forget. If you use the reset command without specifying an option, it operates as the mixed option. And if the history you want to revert was already pushed to the remote repository, you must use the --force option when pushing history after reset.
Revert
Revert is also a command used when you want to revert history like reset. If reset eliminated all history after the specified commit, revert is a feature reverting changes of a specific commit. Here, reverting that commit doesn’t delete that commit from history but reverses the content of the commit to revert.
$ git revert 35058b4 # Revert specific commit
$ git revert 35058b4..c04f8f6 # Revert specifying commit range
$ git revert HEAD # Revert commit where current head is positioned
If commit 35058b4 added character a to line 2 of A.js, using git revert 35058b4 adds a commit that deletes a again from line 2 of A.js. In other words, it removes added items and re-adds removed items. So unlike reset, revert doesn’t delete history but leaves history in the form of adding one commit.
* 35058b4 - Revert Got dumped by girlfriend for finding a bad restaurant. # Let's revert only the history of getting dumped
|
* 19061e7 - Got dumped by girlfriend for finding a bad restaurant.
|
* e50aff9 - Girlfriend says it's not tasty.
|
* 2d57c29 - Ordered aglio olio.
|
* c04f8f6 - Visited the restaurant I found.
|
* 7d9d953 - Found a good restaurant to visit with girlfriend!
In the above example I reverted the commit of getting dumped by my girlfriend, but my dark history remains intact in history.
I don’t usually use revert often, but I’ve tried reverting commits when test console.log statements got squeezed in. Both reset and revert are features reverting changes, but their reverting methods are completely different, so use them appropriately.
Wrapping Up
Even writing two consecutive posts about Git, I still haven’t explained everything about Git. That shows Git is a tool with truly diverse features helping users effectively manage versions. As I mentioned above, due to the nature of managing application versions, if you don’t know how Git operates or what happens to versions when you use this feature, you can’t help but be scared.
The thought “what if code other people wrote flies away because I move my finger wrong…?” - I’ve had it too and many developers who use Git really well now have probably all thought it once. (Actually unless you deliberately reset and force push, it rarely happens)
But the concept or feature names Git talks about feel unfamiliar, but knowing them, how Git’s features actually operate isn’t that complex. And I think complexity from poorly managed version history graphs plays a part too. Honestly looking at tangled graphs doesn’t really make you think “oh this looks doable.”
I tried writing as easily as possible while writing the post but I’m not sure if readers understood well. Actually I think senior developers a bit older than me have more trouble with Git than developers my age.
Having mainly used SVN to manage versions until now, suddenly Git being trendy with unfamiliar concepts pouring down, I’ve heard several times from seniors saying it doesn’t seem easy to study.
Actually like all programming, Git is best understood by trying it several times yourself and seeing how the history graph changed and how the source changed rather than reading text. There are many services like Github providing free repositories, so I recommend making a practice repository and directly practicing by modifying simple code or text files inside.
That’s all for this post on basic Git for newbies - version management.
관련 포스팅 보러가기
Basic Git for Newbies - Getting Started
Programming/TutorialLet's Keep Our Commit History Clean
Programming/TutorialCustomizing Jira Project Issues
Soft Skills/TutorialSimply Applying HTTP/2 with AWS
Programming/Network[Deep Learning Series] Understanding Backpropagation
Programming/Machine Learning