Implementing PWA in One Day
Service Workers, Web Push, Caching – PWA Implementation Struggle Story

In this post I want to record my struggle story of adding PWA (Progressive Web Application) features to an existing application in one day at work on Friday, July 5, 2019. PWA is definitely positive for UX, performance, SEO, etc. if you just meticulously handle exceptions for unsupported browsers, so I’d been wanting to try it.
But I kept postponing due to lack of time, until yesterday when I finally got some free time.
The project I’m currently working on is closely related to the company’s business model, and there are many internal stakeholders related to this feature, so the PO wanted to test more thoroughly.
So on Friday, specifically speaking, I hotfixed a bug in the morning, researched materials for about an hour after lunch, then ran from about 15:30 to 22:55. Originally I’m the type to work hard during work hours and invest other time in myself so I don’t usually work overtime, but I had only one day given to me so I absolutely had to finish within that, but actually the biggest reason was…

Yes, I underestimated it and got beat up.
I actually have no experience implementing PWA. I’ve run Google’s demos a few times, but the rest I just looked at other experts’ blogs and thought “oh…I want to try too.”
But looking at what others implemented, the code wasn’t complex and Service Worker’s operating principle didn’t feel that unfamiliar, so I was actually underestimating it.
My Original Plan
Originally before getting beat up by PWA, I had a decent plan. Of course, I’m not the type who studies in detail before tackling things but just roughly looks then learns the rest by getting hit directly, which contributed.
Anyway, after eating lunch yesterday and sitting at the office, I quietly thought and concluded “Should I try PWA…? Add Manifest, attach Service Worker, then roughly the rest can be done looking at docs…?”
Still, implementing all PWA features seemed hard by 19:00 quitting time, so I scoped the work.
- Implementing all features seems hard, so first think of it as laying groundwork.
- Install Service Worker.
- Add Manifest.json. Everyone does this, so we should basically do it too.
- Use Pusher SDK and PushManager to show push messages to users even if browser is closed.
- If there’s time, want to try adding application to homescreen on mobile. (Low priority)
- Offline caching next time… (Scope adjustment)
Okay, now that the plan is set, I negotiated with the PO and tester “I’ll go play in my own playground while you test the project,” then branched from master.
I decisively named the branch feature/service-worker-web-push showing my will and started working around 15:30. Still, I thought this would be sufficiently doable in about 4-5 hours…
 My mental state throughout coding
Consequently, among those I properly achieved only goals 1, 2, 3. For goal 4 push messages, Background messaging just struggled and wasted too much time so I failed and implemented using Notification API to display only in Foreground.
Initially I tried using FCM (Firebase Cloud Messaging) already used in Soomgo mobile app, but that would dualize the web client’s push channels, so I tried implementing using only Service Worker’s PushManager without FCM to test.
Now let me explain what problems I encountered while working on these and how I solved them.
First Gateway, Manifest.json
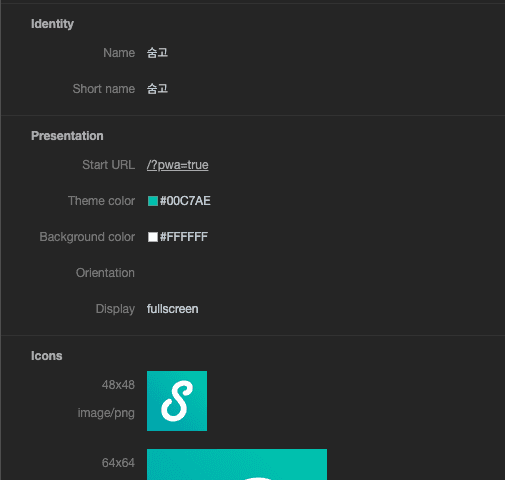
The first thing I did was create manifest.json. This is just literally create it. Also manifest.json is anyway a static file and not frequently updated, so it doesn’t need Express responses. So I created manifest.json in the project’s static directory and wrote it so nginx responds directly.
// static/manifest.json
{
  "name": "Soomgo",
  "short_name": "Soomgo",
  "icons": [{
    "src": "https://d1hhkexwnh74v.cloudfront.net/app_icons/1x.png",
    "type": "image/png",
    "sizes": "48x48"
  }, {
    "src": "https://d1hhkexwnh74v.cloudfront.net/app_icons/2x.png",
    "type": "image/png",
    "sizes": "64x64"
  }, {
    "src": "https://d1hhkexwnh74v.cloudfront.net/app_icons/3x.png",
    "type": "image/png",
    "sizes": "128x128"
  }, {
    "src": "https://d1hhkexwnh74v.cloudfront.net/app_icons/3x.png",
    "type": "image/png",
    "sizes": "144x144"
  }],
  "start_url": "/?pwa=true",
  "display": "fullscreen",
  "background_color": "#FFFFFF",
  "theme_color": "#00C7AE",
}
I wrote detailed content about manifest.json referring to Google Web Developer documentation’s The Web App Manifest.
And those icons are icons currently used in Soomgo app. There’s no reason to use different icons from mobile app, and designers were busy and mentally drained, so I felt too sorry to ask them to make icons because of my technical greed.
Also I thought using same icons for app and web would be good for branding, so I cloned the mobile app repository and secretly stole them. And those images don’t need to be stored in the project, so I uploaded to the S3 bucket the company uses and delivered via CloudFront.
As explained above, I chose the method where nginx handles manifest.json requests rather than Express - if you want nginx to serve without tossing requests to server application like this, just add simple settings.
server {
  ...
  location ~ ^/static {
    root /your/project/location;
  }
  ...
}
Configuring like this directly accesses the project’s static directory. The above setting means “when requests starting with static path come in, find it yourself at /your/project/location.” But when using dev server locally, we don’t use nginx but use NodeJS to directly run dev server, so in local environments Express must directly serve files.
if (process.env.NODE_ENV === 'local') {
  app.use('/static', serve('./static'));
}
Now just add one link tag to tell the browser “my Manifest file is here so take it” and done.
// constants/meta.constant.js
export default {
  // ...
  link: [{
    rel: 'manifest',
    href: '/static/manifest.json',
  }],
  // ...
};<link rel="manifest" href="/static/manifest.json" data-vue-meta="true">Since I’m using the vue-meta library, returning Object type objects like this automatically puts it inside <head> when rendering. Then you can check if the browser properly takes manifest.json in Chrome DevTools’ Application > Manifest tab.
Okay, this took about 10 minutes. So far things were flowing smoothly according to my plan. But problems start now…
Second Gateway, Service Worker
After happily having a cup of coffee, I started work applying Service Worker. Service Worker is a process that runs in the background after installing in the browser, operating completely separately from web application’s main logic.
Service Worker and webapp’s main logic operate by exchanging messages. Send with postMessage, receive with onMessage - same method as WebView or Chrome Extension, so already familiar to us.
However, since not yet supported in all browsers, you must check if serviceWorker object exists inside navigator global object before proceeding with initialization.
if ('serviceWorker' in navigator) { /* ... */ }Well, this level is so familiar to frontend developers like me we can just laugh it off, but something more annoying existed. Exactly Service Worker’s development environment setup.
Development Environment Setup
Since Service Worker can access more features than typical web applications, security is extremely important. So Service Worker was made to operate only in restricted environments - exactly two conditions.
- Web application’s host is localhost or
- Using HTTPS protocol
Unfortunately I don’t satisfy either. My company uses origin http://local.soomgo.com locally, so Service Worker object isn’t activated.
Then solutions narrow to two. I access localhost or attach HTTPS locally.
Actually I missed this and wasted about 30 minutes arguing with my computer like “ah where’s Service Worker? Why not working? Want to die?” Since it’s content written in Korean on official docs, always read official docs meticulously…
Run Dev Server on HTTPS!
Since I’d have to change even the Access-Control-Allow-Origin header backend sends when allowing CORS if I accessed localhost dev environment, I just decided to attach HTTPS to dev environment.
Express supports HTTPS object as built-in object, so can setup simply. First, since SSH key pair is needed to use HTTPS, I made keys using openssl.
$ openssl genrsa 1024 > private.pem # Generate private key
...
$ openssl req -x509 -new -key private.pem > public.pem # Generate public key
Then just save this key somewhere appropriate in the project and use it, but there’s a caution here.
> Generated ssh keys should only be used in local dev environment.
> *.pem files in this directory are added to gitignore./keys/README.md
Never upload SSH keys to remote repository. Security breaks. Of course, since this key doesn’t actually authenticate anything important but only uses it in local dev server, there’s no worry of important things getting stolen, but habits matter. Handle SSH keys like handling bombs.
Instead, I wrote README.md inside the directory storing keys in the project so other developers can easily setup HTTPS environment, detailing what purpose this key will be used for and what cautions are.
And since sometimes you might need HTTP not HTTPS when developing, I allowed selecting protocol using options when running dev server.
// package.json
{
  "scripts": {
    "serve": "cross-env NODE_ENV=local node server",
    "serve:https": "cross-env NODE_ENV=local node server --https",
  }
}
// server.js
const express = require('express');
const https = require('https');
// node options are contained in process.argv as array
const useHttps = process.argv.some(val => val === '--https');
const app = express();
// ...
if (isLocal) {
let localApp = app;
if (useHttps) {
localApp = https.createServer({
// Use the generated key here!
key: fs.readFileSync('./keys/private.pem'),
cert: fs.readFileSync('./keys/public.pem'),
}, app);
}
localApp.listen(port, host, () => {
debug(`${isHttps ? 'https://' : 'http://'}${host}:${port} Let's go!!!!`);
});
}
// ...Writing like this lets you freely change desired protocols when running dev server, so even if I changed dev server to HTTPS and dev server won’t run on other developers’ computers, you can at least buy time and fix bugs.
Real experts expect where they’ll get hit before getting hit and tense up in advance. (One person who’s been hit a lot)
Running dev server on HTTPS, now you can see the serviceWorker object prettily inside the navigator object.
> navigator.serviceWorker
< ServiceWorkerContainer {ready: Promise, controller: null, oncontrollerchange: null, onmessage: null}
Avoiding Problems Without Using HTTPS
Actually at first I found this trick while researching because attaching HTTPS locally was annoying - there’s a method to use Service Worker without using HTTPS even on local server.
Enabling Chrome Flag’s unsafely-treat-insecure-origin-as-secure setting and entering desired host in the text field makes that host judged safe, allowing Service Worker use.
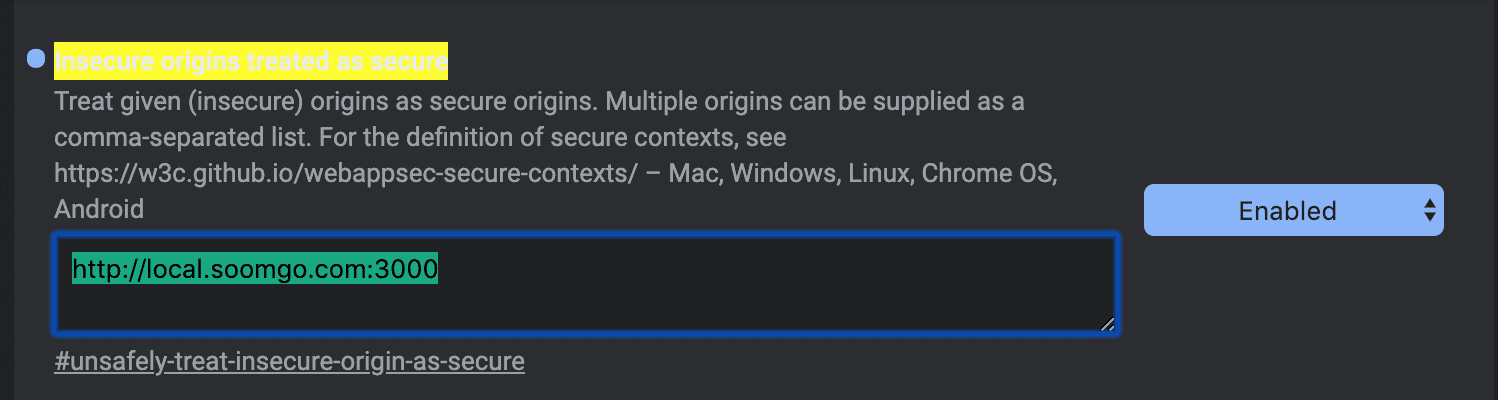
After registering like this, clicking the Relaunch Now button at the bottom restarts Chrome and changes settings. But I ultimately didn’t use this method because it felt uncomfortable creating security vulnerabilities myself.
Writing Service Worker
Now that dev environment setup is complete, nothing’s particularly annoying from here. Just write while looking at docs. First, before implementing Service Worker features, I needed to check if it works well, so I made a Service Worker with no content first.
But like manifest.json, if I just write this completely separated as static/service-worker.js from the web application, it’s convenient when making but later when wanting to access modules or data used in web application from Service Worker, it seemed very ambiguous, so I decided to just build together using Webpack.
First make service-worker.js file!
Even building with Webpack, since this friend doesn’t create something from nothing, naturally source files must exist. First, since the goal is seeing Service Worker work, I wrote it simply.
// src/service-worker.js
self.addEventListener('message', event => {
  console.log('Sent from that table -> ', event);
});
Using Service Worker Webpack Plugin
ServiceWorkerWebpackPlugin is the plugin appearing at the top when searching “Service Worker Webpack” on Google. Let’s all visit the Github repository and look around.
Reading the README, usage is super simple itself. Just put it in Webpack settings and done.
// build/webpack.client.config.js
module.exports = merge(baseConfig, {
  plugins: [
    // ...
    new ServiceWorkerWebpackPlugin({
        entry: path.resolve(__dirname, '../src/service-worker.js'),
    }),
    // ...
  ]
})
Marking the Service Worker file path and passing it as initial argument when creating ServiceWorkerWebpackPlugin object creates sw.js file at the path defined in Webpack config’s output. Of course this file name can be changed, so everyone give it pretty names full of affection according to each taste. I’ll just go with sw.js because I’m lazy.
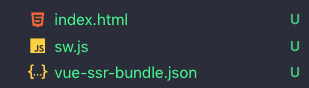 Prettily born sw.js
But this method has a disadvantage - file size becomes larger than typical Service Workers. Since building with Webpack pulls modules or libraries outside Service Worker.
Well, this was a situation I chose to write somewhat conveniently anyway, so can’t help it. Anyway since there’s this disadvantage, readers wanting to reduce Service Worker size might be better off writing directly.
Now that I made Service Worker’s body, only remains telling the browser “I have Service Worker!” when web application initializes.
Installing Service Worker
Installing Service Worker is simple. Check if this browser supports serviceWorker object, then install.
Typical Service Worker installation method just follows Google’s Service Workers: an Introduction documentation. Since I used ServiceWorkerWebpackPlugin, I wrote referring to that plugin’s documentation.
Anyway, installation itself isn’t that difficult whatever method used.
// settings/service-worker.setting.js
export default () => {
  const isSupported = process.browser && 'serviceWorker' in navigator;

  if (!isSupported) {
    return;
  }

  console.log('Browser supporting Service Worker.');

  const runtime = require('serviceworker-webpack-plugin/lib/runtime');

  runtime.register().then(res => {
    console.log('Service Worker installation success ->', res);
  }).catch(e => {
    console.log('Service Worker installation failed ㅜㅜ -> ', e);
  });
}
The reason for checking process.browser value in isSupported variable is because Soomgo’s application runs in Universal SSR environment like Next.js or Nuxt.js.
If curious what Universal SSR is, read my previous post What is Universal Server Side Rendering?.
That module obviously only calls on client side, but still just in case, it’s good to check if current execution context is client or server. Naturally errors occur if trying to access browser API navigator during server-side rendering cycle.
If Service Worker installation succeeded, your Service Worker will be exposed at chrome://inspect/#service-workers or chrome://serviceworker-internals. Method of applying Service Worker is actually quite simple.
But actually the part that consumed most time for me was exactly this Service Worker - the reason is written in Service Worker official docs.
Lack of Installation Failure Notification
If Service Worker registers but doesn’t display at chrome://inspect/#service-workers or chrome://serviceworker-internals, an error occurred or you passed a rejected promise to
event.waitUntil()so installation failed.To solve this problem, go to chrome://serviceworker-internals, select ‘Open DevTools window and pause JavaScript execution on service worker startup for debugging’, and add debugger statement at install event’s start position. Using this option with pause on uncaught exceptions can find problems.
Matt Gaunt contributor to WebFundamentals
Man, debugging this is really hard. If Service Worker installation failed, it should show where error occurred, why it occurred, but just shows one Uncaught DomException and ends.
So you must mark debugger on each code line and infer and fix what went wrong - this is really hard. But they brazenly wrote debugging is hard on official docs, which somehow makes it feel harder.
 Help me detective... find not just culprits but my bugs too...
Third Gateway, PushManager
Now that Service Worker is installed, connecting Service Worker’s PushManager finishes everything! I thought, but this guy was also unexpected.
Since PushManager isn’t yet standard either, it’s not supported in all browsers, so when installing Service Worker you must also check PushManager’s existence.
// settings/service-worker.setting.js
const isSupported = process.browser && 'serviceWorker' in navigator && 'PushManager' in window;
// ...
Condition readability dropped a bit which bothers me, but since it’s operation testing for now I just passed. Right after doing up to here and looking at the next step…
Start of Disaster
Getting Application Server Key
To work with this codelab, you need to generate some application server keys, which can be generated at helper site https://web-push-codelab.glitch.me/.
Here you can generate public and private key pairs.
Copy the public key to
scripts/main.jslike this and change the<Your Public Key>value:
const applicationServerPublicKey = '<Your Public Key>';Note: Never put private keys in web apps!
Matt Gaunt Adding Push Notifications to Web Apps
Huh…? SSH keys needed…? Though unexpected, since it’s one more communication channel between server and client in HTTPS environment, SSH keys being needed seemed right so I quickly accepted.
Looking at Google’s official doc example subscribing to push channels with PushManager, SSH keys were definitely needed.
function subscribeUser() {
  const applicationServerKey = urlB64ToUint8Array(applicationServerPublicKey);
  swRegistration.pushManager.subscribe({
    userVisibleOnly: true,
    applicationServerKey: applicationServerKey
  })
  // ...
}
Well, unexpected but this level is okay. Anyway already using Pusher push solution which ultimately works on same principle, so internally it probably used authentication using SSH key pairs.
Quick Cut-loss
So searching where SSH keys used in Pusher are for about 20 minutes… ultimately couldn’t find.
Pusher internally authenticates using secret value used on server and key used on client - this wasn’t SSH key pairs but just arbitrary strings.
Anyway even making SSH keys, backend has control over web push, so testing alone touching this and that is a bit much. Plus quitting time already long passed so backend folks left work. (Actually doing this on Friday evening is the weird part.)
By then my mental was already a bit out, so I concluded I should ask after coming to work Monday how mobile app uses Pusher integrated with FCM and proceed, then changed direction.
Looking at commit logs, this time was roughly 21:40… no but still gotta leave work… gotta go home…
 Indeed when it doesn't seem right, quick cut-loss is the answer...
Fourth Gateway, Notification API
So the changed direction was “give up Background push messages and at least properly receive Foreground push messages.”
This way I can’t achieve what I initially thought “want to show push messages even if browser is closed,” but if browser is on and connected to soomgo.com, users can see push messages whether they minimized the window or are doing other things, so it somewhat achieves the goal.
After changing direction, it became simple work of just adding code showing notifications to push logic already implemented in existing web application. Anyway, authentication, event subscription logic etc. using Pusher were already all made when developing chat features before.
Inserting Notification into Existing Features
Since I made a helper class wrapping Pusher SDK once when developing chat features before, the structure is solid. Now just add a few methods here and show notifications when web push events occur.
First need a method checking if this browser supports Notification API.
// src/helpers/Pusher.js
isSupportNotification () {
  return process.browser && window && 'Notification' in window;
}
Next write a method getting notification permission from users. Notification has permission property inside, and this property divides into granted, denied, default.
// src/helpers/Pusher.js
getNotificationPermission () {
  if (!this.isSupportNotification()) {
    this.isAllowNotification = false;
    return Promise.reject(new Error('not_supported'));
  }

  if (Notification.permission === 'granted') {
    this.isAllowNotification = true;
    return Promise.resolve();
  }
  else if (Notification.permission !== 'denied' || Notification.permission === 'default') {
    return Notification.requestPermission().then(result => {
      if (result === 'granted') {
        this.isAllowNotification = true;
      }
    });
  }
}
granted is state where user already allowed notifications, denied is rejected state, default is state where user hasn’t decided yet whether to give notification permission.
Therefore we must use Notification.requestPermission method when permission is default state to get permission from users to display notifications.
Now let’s write a method actually displaying notification windows. Since Notification API itself is so simple, it’s not that difficult.
createForegroundNotification (title, { body, icon, link }) {
  const notification = new Notification(title, {
    body,
    icon: icon || `${AssetsCloudFrontHost}/app_icons/1x.png`,
  });

  notification.onshow = () => {
    setTimeout(() => notification.close(), 5000);
  };
  notification.onerror = e => {
    console.error(e);
  };
  notification.onclick = event => {
    event.preventDefault();
    if (link) {
        window.open(link, '_blank');
    }
  };
}
Creating Notification object using new keyword immediately displays notification message at screen top-right on OSX, bottom-right on Windows. Then just register handlers to created Notification object’s event listeners like onshow, onclick.
I decided the method name as createForegroundNotification containing my sadness of not realizing Background messaging. The reason for emphasizing Foreground is containing my ambition to someday make createBackgroundNotification method.
Now that I made everything needed, just connect so notifications work whenever sending pushes through Web Socket in Pusher SDK.
async subscribeNotification () {
  if (!this.isSupportNotification()) {
    return;
  }

  await this.getNotificationPermission();
  if (!this.isAllowNotification) {
    return;
  }

  const channel = await this.getPrivateUserChannel();
  channel.bind('message', response => {
    if (response.sender.id === this.myUserId) {
      return;
    }

    const targetChatRoute = !!response.sender.provider ? 'chats' : 'pro/chats';
    this.createForegroundNotification(`${response.sender.name} sent a message.`, {
      body: response.message,
      icon: response.sender.profile_image,
      link: `${location.origin}/${targetChatRoute}/${response.chat.id}`,
    });
  });
}
Pusher SDK provides features binding event handlers to push channels. message event is an event called when users receive chat messages. But since events are called indiscriminately even for messages you sent yourself, I processed not showing notifications for messages you sent through the response.sender.id === this.myUserId condition.
Next, so users can easily know what’s happening just from small notification messages, create Notification object using format title “OOO sent a message,” message content, and opponent’s profile picture, and done.
 Message showing my mental state unfiltered...sob...
Anyway like this, if soomgo.com is open in browser, users can immediately check new chat messages within desktop without continuously checking pages or checking phones while doing other things.
Still disappointing not being able to immediately show push messages in Background state. But I think even this level is quite convenient from users’ perspective.
Wrapping Up
Actually felt unsatisfied not achieving everything initially targeted, but was too tired so decided to look forward to next time. Now planning to come to work Monday, show this to PO, ask if there’s anything to add, do some testing, then deploy.
Adding fetch event handler to Service Worker also enables Add to Homescreen feature, but actually Soomgo’s frontend chapter’s official position is wanting users to use mobile app more than mobile web, so I’m pondering whether to do this. (Don’t want to cross-browser in-app browsers…)
First, I think I scoped too largely at first. Wish I’d looked into things more detail by detail before working, but had urgent feelings having to immediately work on ongoing project again from Monday. And since the company lacks frontend developers, attaching such technical features is low priority, so I think I had big feelings like “if not now, don’t know when I can do this later.”
Using an intermission, I’ll finish the post while spreading JD recruiting frontend developers to work with me.
Besides PWA there’s lots I want to do but can’t because frontend developers are lacking, so anyone who likes fun things regardless of experience is fine. (I’ll burn this one body to assist so you can do all the development you want.)
That’s all for this post on implementing PWA in one day.
관련 포스팅 보러가기
[JS Prototypes] Implementing Inheritance with Prototypes
Programming/JavaScriptBeyond Classes: A Complete Guide to JavaScript Prototypes
Programming/JavaScriptHeaps: Finding Min and Max Values Fast
Programming/Algorithm[Making JavaScript Audio Effectors] Creating Your Own Sound with Audio Effectors
Programming/Audio[Building JavaScript Audio Effectors] Understanding Audio Flow
Programming/Audio